Showing posts with label How To. Show all posts

Sunday, 21 September 2014

How To Install Google Play Store on Xiaomi Mi3,Mi4,Redmi 1S,Redmi Note

Xiaomi is fastest growing Smartphones Company of the World.Recently it launched Xiaomi Mi4,Xiaomi Mi3,Xiaomi Redmi 1S and Xiaomi Redmi Note.These Phones becomes very popular because of their affordable Prices and killer specifications.We know that these Xiaomi Smartphones comes Android OS.But their is no Google Play Store to install Android Apps on Xiaomi Smartphones.Peoples can only install the Android Apps and Games from Mi Market.Most of Peoples says that they are not satisfied with Xiaomi Mi Market because it not contains all popular Apps and Games.Xiaomi is Chinese company and because of Chinese legislation Google Play Store is not Pre-installed on Xiaomi Phones,But now you can install the Google Play Store on your Xiaomi Mi3,Mi4,Redmi 1S and Redmi Note following below steps.


Advantages of installing Google Play Store on Xiaomi Phones :


  • You can install Androids Apps Easily.
  • Google Play Store is available in 100% Pure English.


Install Google Play Store on Xiaomi Redmi 1S,Note,Mi3 and Mi4 :

Installing the Google Play Store on Xiaomi Devices is actually very easy.You can install the Google Play Store on your Xiaomi Smartphones by following below steps.

1. First of all,Connect your Xiaomi Android Phone with Mobile Data or Wi-Fi.
2. Open Mi Market on your Xiaomi Device.
3. Now search for 'Google'.


4. Now tap on first app which was developed by ENC Xiang.
5. Now tap on Install button to install Google Play Store on your Xiaomi Android Phones.

After tapping on Install button,You will need to Sign in to Xiaomi Market or if you don't have Xiaomi account then you should create new account.

After installation of App is completed,Open it and scroll down to Google Play Store.After that tap on Install button of Google Play Store.Now click on OK button and then tap on Install All button to install Google Play Store on your Xiaomi Phones.

Now Google Play Store is successfully installed on your Xiaomi Mi3,Mi4,Redmi 1S and Redmi Note.After Google Play Store is installed on your Xiaomi Phones then you should sign in with your Google account to install all Android apps from Google Play Store.

Monday, 15 September 2014

How To Remove Ads From Android Apps and Games

How To Block Ads From Android Apps and Games
Android is best Mobile Operating System of the World.It is used by million of Peoples from all around the World.But Many peoples now start building Android Apps and Games.They put their ads in Apps and Games to make money.They annoying ads make Android users difficult to use the Phone.So today I'm going to show you to block ads from Android Apps and Games.If you'll block ads from your Android Phone's Apps and Games then performance of your Android Phone will increase.It will also increase Internet speed.There are many methods are developed to block the Ads from Android Apps and Games.But most of them are required rooted Android Phones so after a lot of hard work I found an method with which you can block the Ads from Android Apps and Games without rooting.You can block the Ads from your Android Phone by following below steps.

Advantages Of Blocking Ads on Android Phones :


  • It will increase the performance of your Android Phones.
  • It will increase the Internet speed
  • It will make the Apps or Games User-Friendly.
  • It will saves your Internet Bandwidth.


How To Block Ads From Android Apps and Games :

1. First of all,Enable the Unknown Sources on your Android Phone.You can enable the Unknown  Sources on your Android Phones by going to Settings > Applications or Settings > Security.You can enable the Unknown Sources by ticking check box.If it is already enabled then skip this step.
2. Download the Adblock Plus on your Android Phone.You can download the Adblock Plus on your Android Phone from Here.You can also download the Adblock Plus by scanning below QR Code.
3. After that Install it on your Android Phones.
4. After initialization is completed,Open it on your Android Phone.
5. Now Adblock Plus will automatically select Suitable Filter Subscription for you.You can change the Filter Subscription at any time from Filters list.

If your Android is Rooted then Adblock Plus will ask for SuperUser Permission.You should allow the SuperUser Permission.

Note : Adblock Plus will remove the Ads from both Apps and Games.It will also block the Ads from Browsers.
Now you can easily remove the Ads from Games and Apps of your Android Phones.You just need to install Adblock Plus application of your Android Phones to block all the Ads from Apps and Games.If you have any problem regarding bocking ads in Android Phones then comment below.If you found this article helpful then share it your Friends.

Friday, 12 September 2014

How to Solve or Fix Error Code 80048264 in Windows Phones

Fix Error Code 80048264 in Windows Phones
Windows Phones are becoming popular rapidly.Many peoples likes to use Windows Phones because of their unique and beautiful Design.But many Peoples says that their Windows Phone shows error code 80048264 while downloading apps from Windows App Store.Many Peoples also face this problem while updating their apps.So today I'm sharing an article to How to Solve or Fix Error Code 80048264 in Windows Phones.You can solve Error code 80048264 problem by 4 different methods.So if you want to fix error code 80048264 then follow below methods.After fixing this error,You can easily and Update Apps from Windows App Store.


“There has been a problem completing your request. Try again later”
Error Code :80048264.

Method 1 to Solve or Fix Error Code 80048264 in Windows Phones :

1. First of all,Connect your Windows Phone to Wi-Fi or Mobil Data.
2. Open Settings.
3. Tap on Email + Accounts.
4. Now re-enter the Password of your Microsoft Account in Password Field which you have created.

Method 2 To Fix Error Code 80048264 in Windows Phones :

1. Go to Settings.
2. Tap on Emails + Accounts.
3. Now Press and Hold your Microsoft Account.
4. Now tap on Sync option to sync your Microsoft account with your Windows Phone.

Now you can install the new and update the previous Apps on Windows Phones easily.But still if you're not able to fix error code 80048264 then follow below steps.

Method 3 to Solve Error Code 80048264 in Windows Phones :

1. Connect your Windows Phone to Wi-Fi or Mobile Data.
2. Go to Mail.live.com and create a new Microsoft Live account.
3. Go to Settings.
4. Here Click on Emails + Accounts.
5. Now tap on Add Email.
6. Now select Microsoft account and enter your Microsoft account's Username and Password which you have created.

Method 4 To Fix Error 80048264 In Windows Phones :

You can also fix the the error 80048264 in your Windows Phone by Resetting your Phone.After your Phone is Reset then all your Apps,Games and other Data will deleted from your Phone.I recommend you to Backup all your Contacts and other Data before resetting your Windows Phone.If you want to reset your Windows Phone then follow below steps.

In Windows Phone 8.1 :
1. Go to Settings.
2. Tap on About.
3. Tap on Reset your Phone.
4. Now you'll receive two Warnings and you just need to tap on Yes.

In Windows Phone 8 :
1. Switch Off your Windows Phone.
2. Now Press and Hold the Volume Down key and connect the Charger.After that your Windows Phone will start showing Exclamatory(!) Sign on screen.
3. Now Press the Keys in below order.
Volume Up > Volume Down > Power > Volume Down

After Pressing the keys in above order,Your Windows Phone will restart.

Now error code 80048264 problem in Windows Phones is fixed and if you face any problem then comment below or contact us.If you found this article helpful then share it with your Friends.

Wednesday, 10 September 2014

How To Use Normal Internet Packs on BlackBerry

How To Use Normal Internet Packs on BlackBerry
BlackBerry is one of popular Company of India to manufacture Smartphones.The Blackberry Phones are specially create for Business use and most of Business mens use their Phones.But many Normal Peoples also use their Phones.If you're one of them,You may know that Blackberry doesn't allow you to use normal Internet Plans on Blackberry Phones.You can't use the Normal Internet Plans on your BlackBerry Phones because Blackberry has provided an special service called Blackberry Internet Service which allow us to use Internet on Blackberry Phones.But it is very costs very high as compared other normal Internet Plans.So today I'm sharing an article to How to use normal Internet Plans on Blackberry Phones.You can use the Normal Internet Plan on your Blackberry Phone by following below steps and remember that you can't use the Blackberry's own Apps like BBM,Email Push Service,Blackberry Browser etc. on Normal Internet Plans.

Using the Normal Internet Plans,You can't use the Blackberry own Apps like BBM and Blackberry Browser on your blackberry Phone.If you really want to use these apps on your Blackberry Phones then you should buy Blackberry Internet Plans.But if you want to use Apps like UC Browser,Whatsapp,Facebook,Twitter etc. then its very useful trick for you.You can use the normal Internet plans on your Blackberry Phones by following below steps.

Requirements to use Normal Internet Plans on Blackberry Phones :

Sim Card with Normal 2G Internet Pack
Blackberry Phone
Apps which you want to use like UC Browser

If you're ready to use Normal Internet Plans on your Blackberry Phones then follow the below steps.

Steps to use Normal Internet Plans on Blackberry Phones :

1. Recharge your Mobile Number with any Normal 2G Internet Plan.If you're already purchased the Normal 2G Internet Plan then skip this step.
2. Go to BlackBerry Menu.
3.  Click on Options and then click on Advanced Options.
4. Click on TCP/IT.
5. Now In APN Field,Type APN of your Operator.You can get APN of your Service Provider by calling Customer Care or APN of some popular Mobile Network Operators are given below.

Airtel  - airtelgprs.com
Vodafone – www
Idea - internet , imis
Aircel – aircelwap , aircelgprs
Uninor -Uninor ( U Must be written in Capital Letter )
Videocon – vinternet.com
BSNL – bsnlnet
TATA Docomo – TATA.DOCOMO.INTERNET
Reliance – rcomnet, smarinet , rcomwap
Virgin Mobile - vinternet
Loop Mobile - www

For More APN's Visit Here or Call Customer Care of your Network Operator.

Now after entering the APN,Leave all other Fields Empty and Save the Settings.

Note : You cannot the Blackberry's Own Apps like BBM and Blackberry Browser on your Blackberry Phones using Normal Internet Plans.You can only use these Apps on Wi-Fi or by purchasing Blackberry Internet Service Plans.You can surf the Internet on your Blackberry Phones using third party Browsers like UC Browser and Opera Mini.

Now you can use the Normal Internet Plans on your BlackBerry Phones.If you have any doubt about using Normal Internet Plans on Blackberry Phones Comment below.I will solve your Problems and doubts as soon as possible.If you found article helpful then share it with your Friends.

Monday, 8 September 2014

How To Install CyanogenMod ROM On Android Phones Without Rooting

How To Install CyanogenMod ROM On Android Phones Without Rooting
CyanogenMod is an open source Operating System for Smartphones and Tablets.It is based on the Android Mobile OS.Many Peoples want to CyanogenMod on their Smartphones and Tablets because it is easy use and runs Android Apps very smoothly.So today I'm sharing an article to How to Install CyanogenMod ROM on Android Phones and Tablets without Rooting.CyanogenMod ROM is currently not supported in every Smartphone or tablet so if your Android Phone or Tablet is not supported then you should install any other Android ROM.If you want to install CyanogenMod ROM on your Android Phone or Tablet then follow the below Steps.

How To Install CyanogenMod on Android Phones/Tablets :

1. First of all,Enable the USB Debugging on your Android Phone or Tablet.You can enable the USB Debugging on your Android Phone or Tablet by going to Settings > Applications > Development > USB Debugging.If your Android Phone is running on Android 4.x or newer then you can enable the USB Debugging by going to Settings > Developer Options > USB Debugging.You should tick the USB Debugging check box to enable the USB Debugging.If USB Debugging check box is ticked then that means USB Debugging is already enabled on your Android Phone or Tablet.

How To Install CyanogenMod ROM On Android Phones Without Rooting

2. Now enable the installations from Unknown Sources on your Android Phone or Tablet.You can allow the installations from Unknown Sources on your Android Phone or Tablet by going to Settings > Security.In some Devices,You can enable the Unknown Sources by going to Settings > Applications.You can enable the Unknown Sources by ticking the 'Unknown Sources' check box.

How To Install CyanogenMod ROM On Android Phones Without Rooting

3. Now Download the CyanogenMod Installer on your Android Phone or Tablet.You can Download the CyanogenMod Installer by opening http://get.cm on your Android Phone or Tablet.After downloading is complete,Install it on your Android Phone or Tablet.

4. Now Download CyanogenMod Windows Installer on your PC or Laptop.You can Download the CyanogenMod Windows Installer For Pc running on Windows 7/ Windows Vista/ Windows 8/ Windows 8.1 by Clicking Here.

5. Now Install the CyanogenMod Windows Installer on your Pc or Laptop.After installation of CyanogenMod Windows Installer is completed,Restart your Pc or Laptop.

6. Now open the CyanogenMod Installer app on your Android Phone or Tablet and then follow the on Screen instructions.
7. Now connect your Android Phone or Tablet with your Pc using USB Cable.
8. Now open CyanogenMod Windows Installer on your Pc and after that CyanogenMod Installer will start detecting your Android Phone or Tablet and if your Phone or Tablet is detected the it will start downloading required Files for your Android Phone or Tablet.


Now you can enjoy the CyanogenMod ROM on your Android Phone or Tablet.If you face any problem in install CyanogenMod on your Android Phone or Tablet then comment below.If you found this article helpful then share it with your Friends.

Sunday, 7 September 2014

How To Increase Battery Life Of Samsung Galaxy Phones

How To Increase Battery Life Of Samsung Galaxy Phones
Samsung Galaxy is most popular Smartphones manufacturing company of India.Its Smartphones are used by billions of Peoples from all around the World.But most of Samsung Galaxy Phones has very low Battery Backup.So In this article,We will learn about increasing Battery life of Samsung Galaxy Phones.You can increase the Battery life of your Samsung Galaxy Phone by many ways.But I'm sharing 5 best and working to increase Battery life of your Android Phone.I test all these ways to increase Battery backup on my own Android Phone and my Friends Phones.So if you want to increase Battery life of your Samsung Galaxy Phone then continue reading.

5 Ways To Increase Battery Life on Samsung Galaxy Phones :

1. Install Battery Saver App :

There are many Battery Saver apps are available on Google Play Store to increase Battery life of Android.These apps close the unwanted running apps and increase the Battery life of Android Phones without decreasing the Performance.You can increase the Battery life on your Samsung Galaxy Phone by installing the these apps.The most used battery saver apps are Battery Doctor and DU Battery Saver.These are free Battery Saver apps and you can find the more Free and Paid Battery Saver apps from Google Play Store.These Battery Saver apps increase your Android Phone Battery by upto 50%.Generally,These apps kill the unwanted apps automatically when screen is locked but you an also manually kill the apps and save the Battery life.

2. Turn Off Wireless Connections When Not in Use :

You can also increase the Battery life of your Samsung Galaxy Phone by disabling the Wireless connections such as Wi-Fi,Mobile Data and Bluetooth.These Wireless Connection consume the Battery life of the Android Phones very fast.But you can increase the Battery life of your Android Phone by disabling the these Wireless connections.You can also increase the Battery life of your Samsung Galaxy Phone by disabling the GPS. You can also disable all the Wireless connections by enabling Air Plane Mode.

3. Don't Use Live or Animated Wallpapers :

I saw many Peoples use Live and Animated Wallpapers on their Samsung Galaxy Phones to impress the Friends.So if you're are one of them then remove the Live or Animated Wallpapers from Android Phone Screen because Animated Wallpapers consume 50% more Battery life than Plain Wallpapers.You should start using less colourful Wallpapers on your Android Phone because the less the Colors appears the less the Power consume.If your Samsung Galaxy Phone's Battery life still not improve then use Black or White Screen.

4. Enable Power Saver Mode :

Most of Samsung Galaxy Phones comes with Power Saver and Extreme Power Saver Modes.You can enable the these Power Saver Modes to increase Battery life.

5.  Kill the Apps Running in Background :

If Battery life of your Android Phone still not increases then you should kill the Apps running on Background.Normally,You can kill the Apps running on Background by navigating to Settings > Apps.You can kill the unwanted Apps by swiping to left.


Now you can increase the Battery life of your Android Phone easily.If your Samsung Galaxy Phone's Battery life still not improved then you should buy Power Bank.If you face any problem related to Battery life of your Phone then Comment below.If you found this article helpful then share it with your Friends.

Saturday, 6 September 2014

How to Turn Your Pc/Laptop into Wi-Fi Hotspot

Turn Your Pc into a Wi-Fi HotspotIn these days,Almost every Person want to use Internet on their Phones and Computers.So today I'm sharing an article to How to Turn your PC into Wi-Fi Hotspot.There are many Applications are available For Windows 7 and Windows 8 to Turn PC into Wi-Fi Hotspot But you can easily turn your PC into Wi-FI Hotspot by using an Application called 'MyPublicWifi'.This application is Freeware and available for free on official Website.You can download the application easily without paying any Money.If you want to turn your Pc or laptop into a Wi-Fi Hotspot then follow the steps below.

Requirements To Turn PC/Laptop into Wi-Fi Hotspot :


  • A PC or Laptop
  • MyPublicWifi Application
  • Your Pc Should Run on Windows 7,Windows 8 or Windows 8.1.

How To Turn Your Pc or Laptop Into Wi-Fi Hotspot :

You can turn your PC into a Wi-Fi Hotspot by using an application called 'MyPublicWiFi'.This application is Freeware and available for Windows 7,Windows 8 and Windows 8.1.

1. First of all,Download the 'MyPublicWifi' for your Pc or Laptop by Clicking Here.
2. Install it on your PC or Laptop and don't forget to restart to PC after installation is completed.
3. Now right-click on 'MyPublicWifi' icon from Desktop and then click on 'Run as Administrator' to run the Application as Administrator.
4. Now click on 'Stop Hotspot' button.
5. Now click on 'Automatic Hotspot Configuration'.

How To Create Wi-Fi Hotspot in Windows 7 and Windows 8

6. In Network Name(SSID) Field,Enter the Name of your Wi-Fi Hotspot.
7. In Network Key Field,Enter the Password of your Wi-Fi Hotspot.
8. After completing all above steps,Click on 'Set up and Start Hotspot' button.

Now you can use your Pc or Laptop Internet on your Phones and other Devices.You can see the list of connected Devices by clicking on 'Clients tab.You can Manage your Wi-Fi Hotspot by selecting 'Management' tab.


Now you can turn your PC or laptop into a Wi-Fi Hotspot by following all above steps.If you face any problem or have any doubt then comment below.If you found this article helpful then share it with your Friends.

Friday, 5 September 2014

How To Download Instagram For PC

How To Download Instagram For PC
Instagram is an online Social networking service that allow us to capture Photos/Videos and share them on many popular Social networking sites like Facebook and Twitter.The Instagram application is available for only Mobile Devices and we can't Download Instagram for Pc or Mac.So peoples face many problems because most of Peoples use Social networking sites on their PC rather than Mobile phones.So I'm sharing an article to How to Download Instagram For PC running on Windows 8,Windows 8.1 and Windows 7.So if you want to download Instagram for your Pc then you can use below Methods.

Method 1 : How To Download Instagram For Pc Using Pixsta :

How To Download Instagram For PC

Pixsta is a free app that allow us to access the Instagram on our Computers and Laptops.Using the Pixsta,You can view,share and discover beautiful Photos from Instagram on your PC.You can also download the Instagram Photos directly on your PC.You can also comment and like the Photos of others.If you want to use Instagram on your Pc using Pixsta then follow the step below.

Steps to Download Instagram on Pc using Pixsta :

1. First of all,Download Pixsta on your Pc by Clicking Here.
2. Now install it on your Pc.
3. After initialization is completed,Open it.
4. Now Log in with your Instagram account.

After completing all the steps,You can Instagram on your Pc without any problems.If you don't have Instagram account then you can create that by using your Friend's Android or iPhone.If

Method 2 : How To Download Instagram For Pc Using Bluestacks :

Bluestacks is best Android Emulator of the World for Windows 7,Windows 8 and Mac.It is used by millions of peoples for running Android applications on their Computers and Laptops.In Bluestacks,Downloading and Installing the Apps is much easier than all other Android Emulators.So now we will use Bluestacks to run Instagram on PC.You can download and install the Instagram on your PC using Bluestacks by following below steps.

Steps To Download Instagram For Pc Using Bluestacks :

1. Download the Bluestacks App Player on your Pc by visiting www.bluestacks.com.
2. Now Install Bluestacks App Player on your PC.
3. Now Open it on your PC.
4. Now click on Search button and search for 'Instagram'.
5. Now click on Instagram app.
6. Now Google Play Store will open.Here you'll need to click on Install button to install Instagram on your PC.

Now Google Play Store will start downloading the Instagram app on your Pc and after downloading is completed,Bluestacks will automatically install the Instagram app on your PC.

Method 3 : How To Use Instagram On PC Using Webstagram :

Webstagram is best Instagram Web Viewer of the World.Using Webstagram,You can view the Photos of Peoples you're following.You can also Like and Comment on their Photos.You can browse the popular Users and able to Follow them.You can also Unfollow them at any time.You can also view the popular Photos from Hash tags.You can use the Instagram on your PC using Webstagram by following below steps.

Steps To Use Instagram On PC Using Webstagram :

1. Visit Webstagram's Official Website www.websta.me.
2. Click on Log in button.
3. Now Log in using your Instagram Username and Password.
4. After entering the Username and Password,You'll be redirect Instagram's Website.Here you'll need to click on Authorize button to Instagram on your PC.

Now you can also use the Instagram on your PC using Webstagram.If don't have an Instagram account then you can create one from your Android or iPhone or you can use your Friends Phones for creating an Instagram account.

Method 4 : How To Use Instagram on Pc using Instagram's Website :

Officially,Instagram don't allow us to use Instagram on PC or other Device,But by using the easiest trick you can use the Instagram on your PC,laptop and Mac.So if you want to use the Instagram on your PC using Instagram's Website then follow the below steps.

Steps To Use Instagram On PC Using Instagram's Website :

1. Type the below Web address in your Browser's Address Bar and Replace the Username with Instagram Username.


www.instagram.com/username
2. After your Instagram Profile is opened,Log in using your Instagram Username and Password.

Now You can download Instagram for your PC and if you face any problems in installing Instagram on PC then comment below or Contact us.If you found this article helpful then share it with your Friends.

Thursday, 4 September 2014

How To Root HTC Desire 816 Easily

HTC Desire 816 is the best Android Phone of the HTC Desire Smartphones Series.Its Design and Shape is beautiful.It comes with 1.5 GB of RAM and 1.6 GHz Quad Processor.Many Peoples says that the Internal memory of the Phone is very low and they face many problems while installing big apps and games.So today I'm sharing an article to How to Root HTC Desire 816.After Rooting the HTC Desire 816,You can uninstall the Pre-installed Android apps to free up the Internal Memory.After rooting,You can also install the Android apps to SD card.You can checkout more Advantages and disadvantages of Rooting Android Phone below.If you want to root your HTC Desire 816 then follow the steps below.


Advantages and Disadvantage of Rooting Android Phone :

Advantages :

  • Install Incompatible Apps
  • Unlock Hidden Features
  • Phone Speed and Battery Backup Increases.
  • Block Ads From Apps and Games.
  • Able To Remove System and Pre-installed Android Apps.
  • Install Any Custom ROM Without Any Problems.
  • Install Android Apps On SD Card

Disadvantages :

  • Your Phone's Warranty Will be Voided.
  • Your Phone may Get Bricked or Damaged During Rooting Process.


Requirements To Root HTC Desire 816 :


  • A Computer or Laptop
  • Internet Connection
  • USB Cable

Pre-Requisites to Root HTC Desire 816 :


  1. Charge the Battery of your Phone to above 60%.
  2. Backup all your Contacts and other important Data.


How To Root HTC Desire 816 :

1. First of all,Install the HTC Sync Manager on your Computer or Laptop by Clicking Here.
2. Now Download CWM Recovery on your Computer by Clicking Here.
3. Now Download SuperuserSU file on your Computer by Clicking Here.
4. Now connect your HTC Desire 816 with your Computer using USB Cable.
5. Now copy to SuperuserSU Zip file to your Phone's SD Card.
6. Now run CWM Recovery file on your Computer.
7. After installation of CWM Recovery is completed,You should select Recovery option from your Android Phone to boot into CWM Recovery Mode.
8. Now select Install Zip from SD Card and then select Choose Zip from SD Card.Now select the SuperuserSU file that you have downloaded in 3rd step.


Now your HTC Desire 816 is successfully rooted and if you have any doubt whatever your Android phone is rooted or not then you can verify that by installing an app called 'Root Checker'.If you face any problem in rooting your HTC Desire 816 then comment below.If you found this article helpful then share it with your friends.

Wednesday, 3 September 2014

How To Access Windows Shared Files/Folders on Android Via Wi-Fi

In these Days,Almost everybody has Computers and Android Phones.Most of Android Phones on the market comes with very low internet and expendable memory.So its very difficult for Peoples to store thousands of Movies and Videos.After searching a lot on +Google,I found that Peoples can directly stream the Movies and other Files on their Android Phones over Wi-Fi.So today I'm sharing an article to access shared Files and Folders on Android Phone over Wi-Fi.You can access the shared Files and Folders on your Android Phone by installing an app called 'ES File Explorer'.This Android File Manager allow us to access shared Files and Folders on Android Phone over Wi-Fi Network.If you want to access your shared Files and Folders on your Android phone then follow the steps below.

Requirements To Access Windows Shared Folders on Android :
Android Phone with ES File Explorer Installed.
A Computer or Laptop with Windows 7 OS.
Wi-Fi Network

Advantages :
Stream Videos and Movies from Computer.
View the Images and other supported Files.
Transfer Files From Computer to Android Phone.
Edit Supported Files and Documents


How To Access Shared Files/Folders on Android Via Wi-Fi :

How To Share Files and Folders on Windows 7 :

1. First of all,Open the Folder or File which you want to share with your Android Phone.
2. Now right-click on it and then click on Properties.

How To Access Windows Shared Files/Folders on Android Via Wi-Fi

3. Click on Sharing tab.
4. Click on Share button.

How To Access Windows Shared Files/Folders on Android Via Wi-Fi

5. Now type 'Everyone' in the Name field and then click on Add button.

How To Access Windows Shared Files/Folders on Android Via Wi-Fi

6. Now select the Permission Level according to your need.After that click on Share button.
7. Click on Done button.
8. Now navigate to Control Panel > Network and Internet and Network and Sharing Center.Here click on Change Advanced Sharing Settings.Now scroll down to end of the Page.Here if you want to allow only few Peoples to access your Files and Folders then select Turn On Password Protected Sharing.If you want to allow Everyone to access your Files and Folders then click on Turn Off Password Protected Sharing.

How To Access Windows Shared Files/Folders on Android Via Wi-Fi

9. After Enabling or Disabling Password Protected Sharing,Click Save Changes button.

Now you can view your shared Files and Folders on Network Folder of your Computer.You can also view your shared Files and Folders by right-clicking on My Computer and then clicking on Manage button and then click System Tools and then click on Shared Folders.You can share unlimited Files and Folders on your Computer.

How To Access Shared Files and Folders on Android Phone :


You can access your shared Files and Folders on your Android Phone by installing an App named 'ES File Explorer'.This Android File Manager or File Explorer comes with lots of unique and powerful features.It also allow to access the shared Files and Folders on Android Phone via Wi-Fi.
So if you want to access your Files and Folders on your Android phone then follow the steps below.
1. First of all,Download and Install ES File Explorer on Android Phone.You can install the ES File Explorer from Google Play Store by Clicking Here and make you sure that your Android Phone is running on Android 2.1 or Above.If your Android Phone is running on Android 1.5 to Android 2.0 then install the ES File Explorer from here.

2. After installation is completed,Run it on your Android Phone.Now Es File Explorer will start showing all Files and Folders of your SD Card and Phone Memory.
3. Now swipe from right side to left side to access the LAN Section.In LAN Section,Tap on New button.
4. Here leave the Domain Name empty and fill up IP Address of your Computer in server field.You can find the IP Address of your Computer by following below steps.

Find IP Address Of Computer Using CMD :
1. Open Command Prompt on your Computer.
2. Type ipconfig and press Enter button.

Now you'll see IP Address of your Computer.

5. Now if have enabled the Password protected Sharing then enter your Username and Password.And if you have not enable the Password Protected Sharing then leave the Username and Password fields empty and tick the 'Anonymous' check box.If you're connecting with your Computer using Username and Password then don't check the 'Anonymous' check-box.
6. Now type your name in Display as field.
7. After completing all above steps,Tap on OK button.

Note: Both Computer or Laptop and Android Phone should be connected to same Wi-Fi Network.

Now you can browse all your shared Files and Folders on your Android Phone via Wi-Fi.If you face any problem in accessing your Windows shared Files and Folders from your Android Phone then comment below.

Tuesday, 2 September 2014

How To Block Websites In Google Chrome

Block Sites on Google Chrome
Google Chrome is most used web-browser of the World and according to StatCounter,It is used by almost 45% of peoples in May,2014.So today I'm sharing an article to How to block websites in Google Chrome.Peoples from all around the World want to block Websites on Google Chrome because of many reasons.In most cases peoples block Websites on Google Chrome so that their kids always be safe from harmful sites and many Peoples block Websites on their Google Chrome browser so that they can concentrate on their Work.You can block the Websites on your Google Chrome Browser by installing 'Block Site' extension.This Google Chrome extension was created by wips.com.This Chrome Extension is available in both Free and Paid version.Features of Free version are same as Paid version but Free version doesn't allow us to stop Peoples from uninstalling the Extension or Google Chrome Browser.So if you want to block Websites on your Google Chrome Browser then follow the steps below.

How To Block Websites on Google Chrome Browser :

1. First of all install Block Site Extension in your Google Chrome Browser.You can install the Block Site extension in your Google Chrome Browser by Clicking Here.
2. Now open Extensions page on your Google Chrome.You can open the Extensions page by typing chrome://extensions in Address bar.
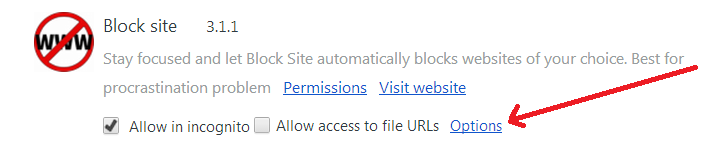
3. Now go down to Block Site extension and tick the check box 'Allow in Incognito' to allow the extension in Incognito window.

How To Block Specific Sites on Google Chrome

4. Now click on Options.


5. Now enter URL of the Website which you want to block and then click on Add Page button.

Website Blocker For Chrome


Now you can block the Websites in your Google Chrome Browser easily without spending much time.Now if anyone will try to visit blocked website then Block Site extension will show 'Site Blocked' error.Instead of showing error page,You can also redirect the them to specific Websites by entering the website URL in Default Redirect Page.

Website is blocked

You can also Protect the Uninitialization of Extension or Google Chrome Browser by buying its Premium account. This Google Chrome extensions also allow us to block Websites for specific Days and Time.

Now if you face any problem in blocking Websites on Google Chrome Browser in Windows 8.1, Windows 8 and Windows 7 then Comment below.If you found this article helpful then share it with your Friends by using below sharing buttons.

Monday, 1 September 2014

How To Install Google Play Store On Blackberry 10 Phones

Blackberry recently launched its latest version of Blackberry OS which allow us to directly install the Android Apps.But the there is no Google Play Store on Blackberry Phones so its very difficult for the Peoples to download and install the Android Phones.Many Peoples who transfer from Android to Blackberry are also suffering this problem because they purchased many Android Apps on Google Play Store.So today I'm sharing an article to How to install Google Play Store on Blackberry 10 Devices.Actually, Officially- Google Play Store is not supported by Blackberry Phones but you can install the Snap Google Play client for installing Android Apps on your Blackberry Phones.So if you want to install Google Play Store on your Blackberry phones then follow the below steps.

What Is Snap ?

We all know that Google Play Store is not supported in Blackberry Devices but RedLightsOfLove modify the Google Play Store and made it available for Blackberry Phones.This is best Google Play Store Client for Blackberry Devices.You can install the Snap Google Play Client on your Blackberry Phone by

Requirements :

Your Device Should Run On Blackberry 10.2.1.1055 or Above.
PC or Laptop with Google Chrome Browser Installed.


How To Install Snap Google Play Client on Blackberry Phones :

1. First of all,Open Google Chrome Browser on your Computer or Laptop.
2. Now Open Google Chrome Web Store and Search For 'Playbook Manager'.
3. Now select BB10 PlayBook App Manager.
4. Install the extension to Google Chrome.
5. Now enable the Development Mode on your Blackberry Phone.You can enable the Development Mode on your Blackberry Phone by going to Settings > Security > Privacy > Development Mode.Now the Turn the Development Mode On and if it ask for Password then enter the Password or create a new Password.
6. Now note the IP Address of your Blackberry Phone by going to Setting > About > Network > Wi-Fi or USB > IPv4.
7. Now connect your Blackberry Phone with your Pc or Laptop using USB Cable.
8. Now log in to Playbook App Manager using the IP Address that you noted in 6th step.
9. Now click on Save button and if you'll see SSL error then click on Proceed Anyway.
10. Now enter your Development Mode Password.
11. Now download the Snap Google Play Client by Clicking Here.
12. Now Drag and Drop the Snap Google Play Client in PlayBook App Manager near Install Apps button.

Now Snap Google Play Client will start installing on your Blackberry Phone.After installation of Snap is completed,Snap Google Play Client will ask for Google Account so enter your Google Account Credentials or if you don't have any Google Account then create a new one.You can install favourite Apps without purchasing them again.If you face any problem in installing Android Apps on Blackberry through Snap Google Play Client then comment below.If you found this article helpful then share it with your Friends.

Wednesday, 20 August 2014

How To Open Password Protected PDF Files Without Password

How To Open Password Protected PDF Files Without Password
PDF is the best file format in the World to present the Documents.Mostly Peoples and Students likes to share their Documents in PDF file format,But sometimes PDF files are Password Protected and its very difficult for them to open the Password Protected PDF Files.So today I'm sharing an article to How to Open Password Protect PDF Files Without Password.There are many Software and Applications are created to open the password protected PDF Files without Passwords,But most of them are Paid and work very slowly.So after searching a lot on Google,I found an Free Software to open the Password Protected PDF Files without any Password.So if you want to open your PDF Files without Password then follow the below steps.

How Can I Open PDF Files Without Passwords ?

There are many Softwares are developed for Windows to open Password Protected PDF Files with Passwords,But most them are Paid and work very slowly.The Price of these tools are very high as compared to prices of other Softwares.After searching a lot on Google,I found completely Free software named BeCyPDFMetaEdit to remove Password from Password Protected PDF Files.After testing this Softwares on my Windows 8.1 PC,I have written the steps below to open Password Protected PDFs without Password.

What are Requirements :

1. PC or Laptop With Windows 7/Windows XP/Windows 8/Windows 8.1
2. BeCyPDFMetaEdit Software
3. Password Protected PDF File

Steps To Open PDF Files Without Password :

1. First of all,Download and Install the BeCyPDFMetaEdit Tool by Clicking Here.
2. Now Open it on your Computer or Laptop.
3. Now select the Password Protect PDF File which You want Open without Password.
4. Now change the Mode to Complete Rewrite.
5. Click on Open button.
6. Now select the Security tab and change the Security System to 'No Encryption'.
7. Now click on Save button to overwrite the same PDF or click on Save As button to save the edited PDF file with different Name and Location.I recommend you to save the edited PDF file in new Location.

Now You can open the Password Protected PDF Files without Password for Free.If you know about any other Software to open Password Protected PDF Files without Password then comment below.If you face any problem in opening PDF Files without Password then also comment below.If you found this article helpful then share it with your Friends.

Saturday, 16 August 2014

How To Root Asus Zenfone 5

How To Root Asus Zenfone 5
Rooting is most difficult and irritating process of Android Phones.But its very useful for Peoples who always want to customize their Phones.So today i'm sharing an article to How to root Asus Zenfone 5 with Computer.Computer. Asus Zenfone 5 is one of Popular Phone of Asus.It becomes very popular after few days of launch because Asus provides very good specifications at very cheap price tag. Actually,Rooting the Asus Zenfone 5 is very easier than rooting any other Android Phone.You just need install Zenfone Root Apk to Successfully Root your Android Phone(Asus Zenfone 5).After Rooting your Android Phone,You can customize it with other Rom.I recommend you to read the whole step completely and then apply it.Because if you'll do the one step wrong then the process of Rooting Android Phone will be failed.So read steps carefully and be patient because rooting is very time taking Process.So if you want to root your Asus Zenfone 5 then follow the Steps below.

Advantages Of Rooting Android Phones :

  • You can customize your Android Phone in your Own way.
  • You'll able to Install Incompatible Apps.
  • You can unlock the Hidden Features of your Android Phone.
  • It will increase the Speed and Battery Backup of your Android Phone.
  • You can also Block Ads from Apps and Games.
  • You can remove the Pre-installed Applications.
  • You can also Flash the Customs Rom and Custom Kernels on your Android Phone.

Note : If You'll Root your Asus Zenfone 5 then your Phone's warranty will be voided and We(Me and Developers) are not responsible if your Phone is Damaged.So try this at your own Risk.

How To Root Asus Zenfone 5 :

1. First of download Zenfone Root Apk on your Computer.You can Zenfone Root Apk by Clicking Here.
2. Now copy the downloaded Apk to your Phone's Sd Card.
3. After copying is completed,Disconnect your Phone from your Pc.
4. Go Menu > Settings > Security on your Asus Zenfone 5 and enable the Unknown Sources option.If its already enabled then skip this step.

Root Asus Zenfone 5 With Pc

5. Now open your Phone's File Manager and install the copied Apk file.
6. After Initialization is completed,Open it.
7. Now select SuperSU.
8. Tap OK button.
9. After clicking on OK button,The application will start rooting your Android Phone.


Now your Asus Zenfone 5 is rooted and You can install your favorite applications without any Problems.You can check whatever your Android Phone is successfully rooted or Not by installing Root Checker Apps like Simple Root Checker.If Root Checker Apps that your Phone is not Rooted then repeat the same Procedure or Comment below.

Friday, 1 August 2014

How To Add All Facebook Friends To Facebook Group at Once

We all know that Facebook is best Social Networking Site since its creation and Almost every Internet User have a account on it.Since now,Many Facebook Groups Admin don't know to How to Add All Facebook Friends to Facebook Group in Single Click.So today I am sharing an article to Invite all Facebook Friends To Facebook Group without their Permissions. Actually,This this trick of inviting all Facebook Friends to Facebook Group is created by Iftekhar Ahmed of Iftiseo and I'm just sharing it with You.You just need to Paste the code Console Window of your Browser for Adding all Facebook Friends to Facebook Group.After you'll Paste the Code the script will start working and automatically start adding your Facebook Friends to your Facebook Group.It is best to Increase Members of Facebook Groups.Many Facebook Groups Admin have very less number of Members to their Facebook Groups and they can use this trick to increase their Facebook Group's Members.You can add your Facebook Friends to your Facebook Group in Single click by following the below steps.


How To Invite All Facebook Friends To Facebook Group :

1. First of all,Open the Facebook Group in which you want to add your Facebook Friends.
2. Open Developers Window by Pressing F12 button.You can open the Developer Box by Right-clicking on anywhere and then selecting Inspect Element and then selecting Console option from top Tabs.
3. Now copy the Code from Here.
4. Now Paste the Code in Console Window and Press Enter button to Proceed adding Friends to Facebook Group.After 5-10 Seconds,All your Facebook Friends will be added in your Facebook Group with their Permissions.

Note : If you have large number of Friends in your Facebook account then It may take 2-3 Minutes for Adding Friends to Facebook Group.


Now you can add all your Facebook Friends to your Facebook Friends without any Problems and if the code don't work then comment below or tell us so that I can update the code.If you found this article helpful then you can share it without your Facebook Friends.

Monday, 28 July 2014

How To Download Clash Of Clans For Mac

Clash Of Clans is one of Popular Game of Android and iOS.It is used by millions of Android and iOS Users.Few Months ago,I shared an Tutorial to Download Clash Of Clans for PC and our Readers response very well to that article so today I am sharing an article to How to Download Clash of Clans for Mac.The procedure of installing the Clash of Clans on Mac is very similar to installing Clash of Clans on Windows.You just need to install Bluestacks App Player on your Mac for using Clash of Clans.You can also run the Clash of Clans on your Pc by reading the article How to Download Clash of Clans For Pc.You can download the Clash Of Clans for Mac by following below steps.

What is Bluestacks App Player ?

Bluestacks App Player is android emulator that allow you to run Android apps and games on your PC.It is available for all Microsoft Windows and Mac Operating Systems.The system requirements of Bluestacks Android Emulator are very high so you should need a good Pc or laptop to run it.

How To Download Clash of Clans For Mac :

1. Install the Bluestacks App Player on your Mac by Clicking Here.
2. After Installation is completed,Open it.
3. Now Click on Search button and Search for Clash of Clans.
4. Now click on Clash of Clans and click on Install button.
5. After downloading of Clash of Clans is completed,You'll able to play it on your Mac by clicking on Open button or by directly running from Apps.

Now you can easily play the Clash of Clans on your Mac.If you face any problem in playing Clash of Clans and any other Android Game on your Mac then Comment below or Contact Us.If you found this article helpful then share it with your Friends.

Saturday, 26 July 2014

How To Install Whatsapp on Nokia X,Nokia XL and Nokia X2

Recently Nokia launched 3 Android Phones that are Nokia X,Nokia XL and Nokia X2.Many Peoples bough these Phones because of Name of Nokia.But These Nokia's Android Phones are not supported by Google Play and some apps like Whatsapp may not supported by these Devices.So today I am sharing an article to How to Install Whatsapp on Nokia,Nokia XL and Nokia X2.You can install Whatsapp on your Nokia Android Phones by installing Whatsapp Plus.Whatsapp Plus is modified version of official Whatsapp and developed by Rafalense(Member of XDA Forums).Whatsapp Plus allow us to customize our Whatsapp with 700 different Themes.You can checkout complete Features of Whatsapp Plus below.


Features Of Whatsapp Plus :

Whatsapp Plus is modified version of Whatsapp and You can checkout its Features below.
Themes :
The one of best feature that I like in Whatsapp Plus is their Visual Themes.You can customize your Whatsapp Plus with over 700 different Themes.You can also share your Whatsapp Plus themes with other Whatsapp Plus User.You can download the hundreds of Whatsapp Plus Visual Themes from www.Whatsappthemes.com.

More Emoticons :
The Official Version of Whatsapp comes with good number of Emoticons.But still many Peoples want more Emoticons for presenting their Emotions.So if you're one of them,You should use Whatsapp Plus because it comes with large numbers of Emoticons.

Hide Last Seen Feature :
Using this Feature,You can hide the Last Seen Time stamp of Whatsapp.

Why Whatsapp and Some Other Apps Not Work in Nokia Phones :

Due to absence of Google Play Store,Some apps may not work on Nokia Android Phones.The very Popular app called Whatsapp also don't works on Nokia X,Nokia XL and Nokia X2.

How To Install Whatsapp on Nokia's Android Phones :

Officially,Whatsapp is not available for Nokia X Series.But you can use the Whatsapp on your Nokia X,Nokia XL and Nokia X2 by installing Whatsapp Plus.You can download the Whatsapp Plus for your Nokia Android Phones by following below steps.
1. First of all,Uninstall the Whatsapp from your Nokia Device.
2. Enable the installations of Third-Party Apps.
3. Download Whatsapp Plus by Clicking Here.


Now you can install the Whatsapp on your Nokia X,Nokia Xl and Nokia X2.But if still Whatsapp not work on your Nokia Android Phones then you should install older version of Whatsapp Plus.You can download the older version of Whatsapp Plus by Clicking Here.If you face any other problem then comment below or Contact us.If you found this article helpful then you should share it with your Friends and other Nokia Android Phones Users.

Tuesday, 22 July 2014

How To Reset/Unlock Pattern Lock in Android Phones

How to Reset Pattern Locker in Android Phones
Many Persons use Pattern Lock apps to protect their Android Phones from unknown Persons.But if you'll draw the Pattern wrong for 3-5 times then you will be blocked from accessing your Phone and You can only reset the Pattern Locker by Signing with your Google account.Some Peoples also forget their Google accounts password so its very difficult for them to reset the Pattern Locker.So today I am sharing an article to How to Reset Pattern Locker in Android Phones.This article will really help the Android users that are unable to unlock their phones because pattern Lock.You can unlock your Android Phone by using two methods.These two methods are given below.So if you want to Reset/Unlock your Android phone then follow below methods.


Steps to Reset Pattern Locker in Android Phones :


Method 1 :
You can Reset your Pattern Locker on Android Phones by Signing with your Google Account.If you forget your Google Accounts Password then you can recover your Password by Clicking Here.Here you'll need to provide information about you and your Google account.After providing the correct information,Google will send Password to your Mobile Number or Recovery Email.This is the easiest method to reset the Pattern Locker and you just need to sign in with your Google account to reset Pattern locker.If this method don't work for you then you can use second method to reset Pattern Locker.

Method 2 :

Note : If you Factory Reset your Android Phone then all your Data and Setting will deleted.You should take backup of your Personal data to avoid any loss.

You can also reset the Pattern Locker by Factory Resetting your Android Phones.So let's continue to reset Pattern Locker app.
1. Switch off your Android Phone.
2. Now Turn On your Phone by Pressing together 'Volume Up' 'Home' and 'Power' Keys.You device should be start in Recovery Mode.If your Device doesn't have Home key then you should press 'Volume UP and 'Power' Keys to start in Recovery Mode.
3. Now scroll down to 'Restore Factory Defaults' or 'Clear All User Data.

Extra Tip : You can navigate in Android Recovery Mode using Volume Up and Volume Down Keys.

4. After clicking on above Option,Reboot your Device by selecting 'Reboot System' Option.


Now you can use your Android Phone again by resetting your Pattern Lock.If you face any problem in unlocking your Android Phones then comment below or contact us.If you found this article helpful then you can share it with your Friends.

Tuesday, 8 July 2014

How to Block Sites On Safari For iPhone and iPad

How to Block Sites On Safari For iPhone and iPad
iPhone and iPad are most used Devices in the World and Peoples likes them very much.In iOS 6,You can't Block the Specific Websites in Safari on your iPhone and iPad,But in iOS 7 or Earlier,You can Block any Website without any problems through Restrictions Option.Because iOS is comes after release of iOS 7 so you can also Block the specific Websites in Safari on iOS 8.You just need to enter the Name and Url of Websites to Block it in Safari on your iPhone and iPad. Most of Parents of the World share their iPad and iPhone with their Kids and its very difficult for them to Block Websites.So this article will really help those Parents to save their Kids from harmful Sites.If you want to block Websites in Safari on iPhone and iPad then continue reading.

Why Peoples Block Websites on Their iPhone and iPad :

Mostly Parent shares their iPad and iPhone with their Kids and they want to protect their Kids from harmful sites so they blocked the Websites.

How to Block Websites in Safari on iPhone and iPad :

1. First of all,Open Settings from Home screen of your iPhone or iPad.
2. Now select General.
3. Now tap on Restrictions.
4. If you have already enabled the Restrictions then enter your Pass code otherwise enable the Restrictions and create a new Pass Code.
5. Now under Allowed Content,Tap on Websites.
6. Now tap on Add a Website under Never Allow.
7. Now tap Done on Keyboard and your entered Website is blocked.

Now you're blocked the Websites in Safari on iPhone and iPad to restrict access to harmful sites.You can check is your entered Website is block or not by entering the Website URL in Browser's Address bar.If you will see error as shown in below image then you're successfully blocked the Website.If you want to blocked to blocked multiple Websites then you need to repeat the same process.


Extra Tip : While blocking some Sites,You need to block their Desktop as well as Mobile Site.For Example,If you're blocking www.XYZ.com then you also need to block www.M.XYZ.com.

Now you can easily block any Website in Safari on iPhone or iPad.If you face any problem in blocking Websites on iPhone and iPad then comment below.If you think that this article is helpful then you should share it with your friends.

Sunday, 6 July 2014

Trace Owner Name Of Any Mobile Number

Find owner NAME Of any Mobile Number
According to Wikipedia, India is second largest Telecommunications system of the World and there are total Number of Mobile Phones are 904.56 million.The most Popular Operators of India are Tata DoCoMo, Vodafone, Airtel, Reliance, Uninor, BSNL, Uninor and Idea.According to Wikipedia,The total number of Mobile Subscribers in India are increasing very fast and India will become the largest Telecommunications System of the World within few Years.But sometimes peoples face many Problems to find Owner name of any Mobile number.So in this article I'm going to show to How to Trace Owner Name of Any Mobile number.Actually,Tracing the Owner name of any Mobile Number is very easy and you can trace unknown Mobile Numbers details like Owner Name,Location and Operator Name.For Tracing the Mobile Number, You just need to select your Country and enter the Mobile Number and after that you will see the Real name and Location of the Mobile Number's Owner.So if you want to Trace any unknown Mobile Number Owner name then follow the Steps given below.


How can I Trace the Owner Name of Any Mobile Number :

There are many Websites are create to Trace Mobile Numbers.But most of them are restricted to show Owner Name so these Websites don't show Owner Name of Mobile Number.After searching a lot on Internet,I found an Trusted and 100% Working way to find Owner name and other details of Any Mobile Number.You can Trace the Owner Name of Mobile Number using Truecaller.

What is Truecaller and How it Works ? :

Truecaller is World's largest Mobile Phone community and you can find Owner Name,Operator Name and Location of any Mobile Number Easily.Its client is available for Android, iOS, Symbian ,Blackberry and Windows Phones.You can also use the Truecaller on your Laptops and Computer by visiting their Official Site.Now the question comes in mind is that How Truecaller find the Owner Name of any Mobile Number?.The answer is very simple,When your Friend or any other person that have added your Mobile number in their Phone contacts install the Truecaller app on their Phones then Truecaller will start uploading the Contacts information to their Server.

How to Find Owner Name of Any Mobile Number :

1. First of all,Visit Truecaller Website.
2. Now select your Country.
3. Enter Mobile Number to Trace its Owner name and other Details.

Trace Owner Name Of Any Mobile Number

4. Now click on Search button and Login with your Facebook,Twitter,LinkedIn or Google + Account.

How to Find Person behind Phone Number

Get Contact Information Using True Caller


After completing all steps,You can see the Real Name and other Information of your provided Mobile Number.But Truecaller not have Information about every Mobile Number so you should alternative of Truecaller to find or Trace owner name of any Mobile Number.

If you want to remove your Name and Information from Truecaller then you can done this by visiting Truecaller's Unlist Page.

Now you can Find or Trace Owner Name of Any Mobile Number.If you face any problem in Tracing Owner Name of Mobile number then Comment below or Contact us.If you found this article helpful then you should share it with your Friends.