Showing posts with label Windows. Show all posts

Thursday, 25 September 2014

Top 5 Free Data Recovery Software For Windows

Top+5+Free+Data+Recovery+Software+Windows
In these days,Everyone has a Computer or Laptop on their Home or Office.Many Peoples delete the important Data from their Computers or Laptops by a mistake.So today I'm sharing 5 Best Free Data Recovery Software and Tools for Windows.These Software or Tools will recover your Accidentally deleted Data from your Computer.They will recover the Data ever if you're deleted it from your Recycle Bin.These 5 Tools for recovering your important deleted Data are completely free of cost.
These all Data Recovery Software are Tested by our Team Members and these Software or Tools work really well.I'm  very impressed with these Tools and I recommend you to use these Tools,If your important Data is accidentally deleted.

How Does These Data Recovery Tools Work ?

When your Important Data is accidentally deleted,Then many peoples thinks that their is no chance of recovery.But still you can recover your deleted Data using these Data Recovery Tools.When your Important data is deleted from Recycle Bin then its still stored at some place and Data Recovery Software just restore your Deleted Data.The chances of recovery of Data are depend upon the Data Type and some other factors.

Top 5 Best Free Data Recovery Software or Tools :

1. Recuva :

Recuva is a best and free tools to recover accidentally deleted Data from your Computer.It comes with many premium features which no other Data recovery Software offers.This Data Recovery Software is very easy to use and anyone can recover their deleted Data using its wizard.It also recover the deleted Files ever if they are deleted from Recycle Bin.Recovering the deleted Data using Recuva is very easy.You just need to select drive from which Data is deleted and then click on Scan button.After that Recuva will start scanning your deleted Files and after the deleted Files are founded then you can recover them.Recuva Data Recovery Software supports all versions of Microsoft Windows.

2. Puran File Recovery :

Puran File Recovery is also a very good Tool to recover accidentally deleted Data from your Computers or Laptops.It also recover the Data from Formatted Disks.It also has capability to recover Data from Pen Drives,Hard Disks,Mobile Phones,CDs.DVDs and any other Storage Medium.It supports 3 types of Scans which will help you to found your deleted Files easily.It recover the Data from Computer or Laptop more faster than all other Data Recovery Tools.

3. Glary Undelete :

Glary Undelete is an excellent Tool to recover Data from Computers or Laptops.The User Interface of the Tool is very similar to Windows Explorer.It can recover the deleted Data from any Storage Device.The disadvantage of Glary Undelete is that it required installation of Toolbar to work.In Glary Undelete,You can also filer the Files using File Name,File Size,File Locations and some other things.

4. Pandora Recovery :

Pandora Recovery is also an good Tool to recover delete Data easily.It comes with 'Surface Search' which will help you to find your deleted Files  easily.Pandora Recovery can recovery Date from Hard Disk,memory Card,Pen Drive and any Device which stores Data.Pandora Recovery also comes in Portable Version which doesn't required installation.You can also transfer the Pandora Recovery Portable Version to your 1 GB Flash Drive.

5. SoftPerfect File Recovery :

SoftPerect File Recover is very useful Tool for recovering deleted Data from Computers and Laptops.It recovers Data from NTFS and FAT Drives.This Tool is very easy to use and it don't required installation for recovering Data from various Storage Devices.

These are Best and Free Data Recovery Softwares to recover Data from Pen Drives,Hard Disk etc.If face any problem in recovering your deleted Data using these then comment below.If you found this article helpful then share it with your Friends.

Thursday, 24 April 2014

How To Record Skype Video/Audio Calls

Record Skype Video And Audio Calls Free
Skype is most popular voice-over-IP and instant messaging service in the World.It was released in August 2003 and since that it is becoming more and more popular.It is available for all major operating systems like Mac, Windows, Android, iOS etc.Almost every Internet user has a Skype account.But there is one problem in Skype that we could not record video or voice calls on the Skype.So today I am sharing an article to How to record Skype calls on Windows,Mac and iPhone/iPad.So if you want to record your Skype calls then continue reading and read until end of article.

How To Record Skype Video/Audio Calls On Windows :

You can record the Skype Video and Audio on your Computers/Laptops by using software called Pamela For Skype.It is available in both Paid and Free(Trial) versions.But it only record calls less than 15 Minutes in Free version.So if you not have money to buy paid version of Pamela For Skype then you can also use the Free Skype Recorder Software.This software is completely free and there are no limitations in this software for recording skype video-audio calls.

Note : Pamela For Skype not work for Metro Ul Version Skype so you should use Skype Desktop Version to record video and audio calls easily.

How To Record Skype Calls On Mac :

There are hundreds of Mac applications are available in Internet for recording Skype Video-Audio calls.But I recommend you to use Ecamm Call Recorder.It is paid application that mean you need to buy it for recording Skype Video-Audio calls but you can also use its trial version if you have any problems.If you not have money to buy paid application for recording Skype Video-Audio Calls then you can also use free Skype Video-Audio recorder.You can find the Skype Video-Audio Recorder by searching on Google or any other search engine.

How To Record Calls On iPad/iPhone :

Recording the Skype calls on iPad/iPhone is very different from recording calls on Windows or Mac.In iPhone/iPad,First you need to make a Skype call then run any voice recording app on the background and then your voice recording app will start recording Skype Audio calls on your iPad/iPhone.You should use QuickVoice Recorder for recording Skype Voice calls because it is free and full-featured application.


Now you can easily record your Skype Calls on Windows,Mac and iPad/iPhone.I please you that you should not record calls on Skype without informing your partner because recording calls on some countries without informing in prohibited .So if you face any problem in recording Skype calls on any device then comment below.if you like this article then share it with your friends.

Sunday, 20 April 2014

How To Remove Write Protection From Pen Drive In Windows 7,XP,8

How To Remove Write Protection From Pen Drive In Windows 7,XP,8
Pen Drives and Memory Cards are very useful for transferring data from one Computer to another Computer.But there are some common problems in Pen Drives and Memory Cards like Write-Protection which are very difficult to remove.But today I am sharing a tutorial to Format Write-Protected Pen Drive or Memory Card.You can format your Write-Protect using many ways but I am sharing only two ways that works best for me and my friends.So if you want to remove write from USB Pen Drive or Memory Card then follow the methods given below.


Remove Write Protection From Pen Drives Using LLF Tool :

1. First of all,Download HDD Low Level Formatting Tool by Clicking Here.It is available for all major operating systems like Windows XP,Windows 7,Windows Vista and Windows 8.
2. Now install it on your Computer or Laptop.
3. Insert your Write-Protected Pen Drive in your Computer and open the HDD Low Level Formatting Tool.
4. Now select your Pen drive or Memory card from drives and click on Continue button.

5. Now select Low-Level-Format from top tabs and click on Format This Device.
6. After formatting is completed,Open Run in your Computer or Laptop by Pressing Win Key + R.
7. Type regedit.exe in the Run and press Enter button.
8. Now find you can find your Pen Drive/memory card along with other drives and allocate space to it.

Format Write Protected Pen Drive/Memory Card Using CMD :

You can also remove Write-protection from your USB Pen Drive/Memory Card using Command Prompt.So if you're ready to remove Write-Protection from any Flash Drive using CMD then follow below steps.

1. Open Command Prompt as Administrator on your Pc.
2. Now enter below command in Command Prompt and replace X with your pen Drive/Memory Card Letter.

format X: /FS:FAT32
3. Now press Enter button and if CMD prompt you to enter drive name then write it and again press Enter button.


Now Write-Protection of your Pen Drive or Memory Card is removed using above methods.So if you face any problem in this tutorial then comment below or report us.So this tutorial works for you then share it with your friends.

Sunday, 13 April 2014

Top 3 Bluestacks Alternatives For Running Android Apps On PC

Bluestacks Alternatives
Bluestacks is one of best Android Emulator for running Android Apps and Games on PC.It is used by millions of peoples.But their are some problems in Android emulator like it required 2 GB and Good Graphic card for installation etc.Many peoples not has 2 GB RAM and good graphic cards on their Computers and Laptops so it is very difficult for them to run their favorite Android Apps and Games.So today I am sharing 3 Best Alternatives to Bluestacks.You can run your favorite apps and games PC/Mac by using these Bluestacks alternatives.The list of top 3 Android Emulator expect Bluestacks is given below.

Top 3 Bluestacks Alternative Android Emulators :

1. YouWave Android Emulators :


Youwave is also one of best Android emulator for Windows.You can download thousands of apps and games by using it.This android emulator not requirement high RAM or Graphic card that means you can also run your favorite apps on low performance pc and laptop.You can download free 10 day trial of Youwave Android Emulator by Clicking Here or you can also buy it for $19.99 from Youwave's official website.

2. GenyMotion Android Emulator :


GenyMotion is best Android emulator for testing Android applications but you can also use it for running android apps and games on your PC and Laptop.The main features of Genymotion that I like is it is free version and not required high performance computers.It has a camera widget that allow you to use webcam as android phone's front camera and back camera.You can download the Genymotion Android Emulator by Clicking Here.

3. Jar of Bean :

Jar of Beans is best Android Emulator for running Android Jelly Beans Applications and Games on PC/Laptop.You can download Jar of Beans Android Emulator by Clicking Here.


Now you can do play your favorite Android games and use popular android like Whatsapp on Pc/Laptop.If any of above emulators not work for you then you can also run your favorite by installing Android 4.3 Jelly Bean Os in Computers and laptops.So if you face any problem then comment below or report us.If you like this article then share it with your friends.

Saturday, 5 April 2014

How To Use Pendrive As RAM In Windows 7,8.1,8 and XP

Use Pendrive As RAM In Windows 8,7,8.1 And XP
RAM is one of important part of Computers and Laptops.In these days,Everyone likes to play high quality games on their Computers but playing games on Computer that has less memory is almost impossible because games are required large amount of memory for playing smoothly.So today I am sharing an article with you to How to Use USB Pendrive or Hard Drive as RAM in Computers and laptops.You can use your Pendrive as RAM by using ReadyBoost.ReadyBoost is feature in Windows 7,8,8.1 that allow us to use any Usb Pendrive or flash drive as instant RAM.So if you has a Pen drive and want to use it as Computer RAM then follow the steps given below.

What Is RAM ?

The full name of RAM is a Random-Access-Memory and speed of processing tasks is depend upon amount of RAM.If the Computer have high Ram then computer process the tasks very fast and if the computer has low ram then task processing speed is slow.So speed of computer and processing task is depend upon the amount of Ram.

How To Use Your Pendrive As RAM In Windows 7/8/8.1 :

1. Insert the Pendrive in your Computer or Laptop and make you sure that Pendrive has at least 1 GB of free space.
2. Now backup your data and format the Pendrive.
3. Now right-click on Pen Drive and click on Properties.

Use External Hard Disk As RAM In PC

4. Click on ReadyBoost tab.
5. Now click on Use This Device.


6. Choose maximum space to reserve to system speed and click OK button.

How To Use Your Pendrive As RAM in Windows XP :

1. Insert the Pendrive and delete all your data from it.Note that your should be at least 2 GB in size.
2. Now right-click on My Computer and then click on Properties.
3. Click Advanced tab.
4. Now click on Settings under Performance.


5. Click Advanced tab and then click on Change button under Virtual memory.


6. Select your Pen Drive.
7. Click on Custom Size.
8. Now enter the Initial and Maximum Size of Pen drive and click on Set button.
9. Now click on OK button and restart your Computer or Laptop.


Now you can increase your Computer or Laptop speed by using your USB Pendrive as RAM.But this is temporary RAM so if you want RAM permanently then you should buy Ram from market.So if you face any problem then comment or report us by visiting our contact us page.If you found this article helpful then share it with your friends.

Friday, 4 April 2014

How To Fix Cursor Jumping Problem In Laptop

Cursor Start Jumping While Typing In Windows 7
Today I am sharing with you to How to fix cursor jumping error in Windows 7 laptops.It is one of common problem in Dell and Lenovo laptops.Typing is very important for bloggers and other peoples that use their laptops for writing long articles.But its very difficult to type on laptops because when your palm or any other part of body touches the touch pad then your laptop's cursor will start jumping.So to stop this problem you need to disable the touchpad while you're typing on laptop.You can disable your laptop's touchpad while typing by using a software called TouchFreeze.This software automatically disables your touchpad while you're start typing and automatically enabled after your typing is completed.

How TouchFreeze Solves Cursor Jumping Problem ?

TouchFreeze is a simple Windows utility that allow you to disable the touchpad while you are typing.You can only solve the cursor jumping problem using this software because it disable your Laptop's touch pad while you're typing and your cursor will not able to jump ever if your palm touches the touch pad.

Fix Cursor Jumps While Typing In Laptop - Windows 7,8,XP :

1. First of all download TouchFreeze on your laptop by Clicking Here.
2. Now install it on your Laptop.

After Installing Touchfreeze,Your Laptop's touch pad will automatically disabled when start typing and will automatically enabled when you start using it.But if this method not works for you then you can also fix cursor jumping problem in laptop by below steps.

Alternate Method For Fixing Cursor Jumping Problem :

1. Click on Start Button and then click on Control Panel.
2. Click on Hardware.
3. Now click on Mouse and then click on Pointer Options tab.
4. Now Uncheck the Hide Pointer While Typing box and click on OK button to save the settings.


Now your cursor jumping problem while typing is fixed and you can type any documents or articles without any problems.But if this problem happens again and again then comment below or contact us so that we can solve your problems.

Tuesday, 1 April 2014

How To Boot Windows 8/8.1 Into Safe Mode

Today I am sharing 3 ways to start Windows 8 and Windows 8.1 into Safe Mode.In Safe Mode,We can troubleshoot the startup and other problems of the system.It is very useful if computer or laptop is not starting normally.But Safe Mode is not available or not works in Windows 8 and 8.1 so read this article to boot your system into Safe Mode easily.We can normally boot into Safe Mode in Windows 8/8.1 by holding Shift and then pressing F8 but sometimes its not work so read the 3 different ways to boot the system into safe mode.So if you want to boot Windows 8/8.1 into Safe Mode then read the methods given below carefully.

1. Boot Into Safe Mode Using System Configuration Tool :

1. First of all open Run on your Computer/Laptop by Pressing Windows Key + R.
2. Now type MSCONFIG in Run and press Enter button.

start windows 8 in safe mode

3. Now click on Boot tab and enable the Safe Mode with Minimal.

how to boot into safe mode windows 8

4. After enabling Safe Mode click on Apply button and then click on OK button.

windows 8 safe mode boot

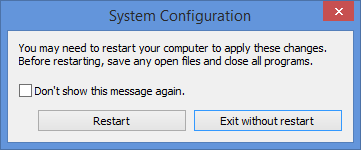
5. After clicking on Ok button a dialog box is shown which is showing that your system need restart to apply these changes and to boot windows 8/windows 8.1 into Safe Mode.So restart your computer by clicking Restart button or you can also restart your computer later by clicking on Exit Without Restart button.After Restarting,Your computer or laptop will boot directly into Safe mode.

2. Boot Windows 8.1/8 Into Safe Mode Using Startup Setting :

1. First of all click on Settings from Windows 8/8.1 Charm Bar.

Boot Windows 8.1 Into Safe Mode

2. Now click on Change Pc Settings.


3. Click on Update And Recovery.
4. Now click on Recovery.
5. Now click on Restart Now button to boot your system into Safe Mode.


6. Click on Troubleshoot.
7. Now click on Advanced Options and then click on Startup Settings.
8. Click on Restart Button.
9. After Restarting.You will see nine options.You can these options by pressing F1-F9 keys or Function Keys.You should press F4 for booting the system in Safe Mode,Press F5 for Enabling Safe Mode with Networking and Press F6 for enabling Safe Mode with Command Prompt.Now your system will boot into Safe Mode.


3. Boot Window 8/8.1 Into Safe Mode Using F8 Key :

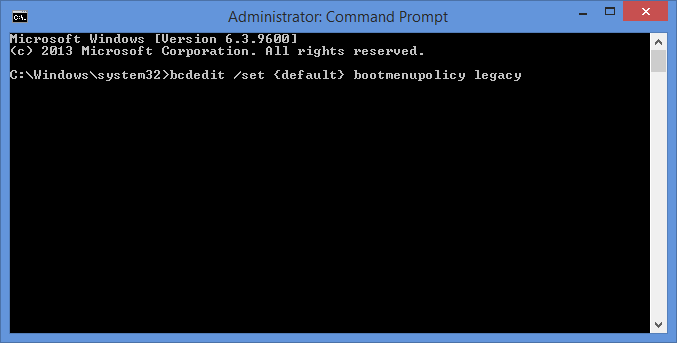
1. Open Command Prompt as Administrator.You can open Command Prompt as Administrator on your Pc by pressing Windows Key + X and then selecting Command prompt(Admin).


2. Now type the below command in command prompt and press Enter key.
bcdedit /set {default} bootmenupolicy legacy
3. Now if you entered the command correctly then windows will report you that operation was completed successfully and your system needs restart to apply these changes.So restart your computers and after that you can use F8 key to boot into Safe Mode.You can disable the F8 below steps.

Steps To Disable F8 Key :

1. Open Command Prompt as Administrator by Pressing Win Key + X and then select Command Prompt(Admin).
2. Now enter the below command in Command Prompt and press Enter Key.
bcdedit /set {default} bootmenupolicy standard
Now your F8 key for booting the system into Safe Mode is disabled.


Now you can boot your Windows 8 and Windows 8.1 into Safe Mode without any problem.If you face any problem then comment below or report us by visiting our contact us page.If this tutorial works for you then share it with your friends.

Thursday, 27 March 2014

How To Save Browsing Session In Chrome,Firefox and IE

Google Chrome,Mozilla Firefox and Internet Explorer are best browsers for the computers and laptops.But these browsers don't have built-in function to save browsing sessions.So today I am sharing an article to How to save browsing sessions in Chrome,Firefox and Internet Explorer to continue your browsing after rebooting the computer or laptop.It is very useful for peoples that use Internet daily.You can backup your browsing tabs by using a browser extension called Session Manager.It is available for all major browsers like Chrome and Firefox.So if you want to save your current browsing tabs then continue reading.


How To Save Browsing Session In Google Chrome :

1. First of all,Download and install Session Manager extension on your Google Chrome browser by Clicking Here.
2. If you want to save your browsing session then click on Session manager.
3. Type the name of your browsing session and click on Save button.

Now your browsing session was saved in Google Chrome and you will able to continue your browsing after long time by just clicking on Session Manager and then clicking on Open button.

How To Save Browsing Session In Mozilla Firefox :

Session Manager Plug-in is also available for Mozilla Firefox that means that you can save your browsing session in Firefox for future use.So if you want to save your browsing sessions in Mozilla Firefox then follow the steps given below.

1. Session Manager extension for you Mozilla Firefox browser by Clicking Here.
2. Install it in your Firefox browser.
3. Now open the tabs which you want to save for future use and click Save Session button.

Now your current browsing session was saved in Firefox and you can restore this session by right-clicking on Session Manager then clicking on your saved browsing session.

How To Save Browsing Session in Internet Explorer :

In Internet Explorer,You can save your browsing session by using a software called IE Session Saver.You can download the IE Session Saver by Clicking Here.


Now you easily save and restore your browsing session.So if you face any problem about this article then comment below or report us by visiting our contact us page.If you found this article helpful then share it with your friends.

Monday, 24 March 2014

How To Make Windows 7 Genuine Using CMD

Today I am sharing an article to How to fix Windows 7 Not Genuine error because my friends and readers ask me to share the tutorial to make the Windows 7 genuine without using any Activator or Loader.After searching lot on Internet I found that we can also make the windows 7 genuine using Command Prompt in just 2-3 minutes.I tried this method on many computers of my friends and classmates so today I am sharing this article with you so that you can also make your Windows 7 genuine and solve the 'This copy of Windows is not genuine' error.If you have lot of money then I recommend you to buy original Windows 7 or Windows 8 for Microsoft.So if you want to fix windows 7 not genuine error using command prompt then follow steps that given below.

Why Windows 7 Becomes Not Genuine :

Windows 7 becomes not genuine because peoples use activators and loaders to activate the Windows 7.But I see that this problem also happens for peoples that buy the original genuine Windows 7.I think this happens because of some issues while updating.

How To Make Windows 7 Genuine Using Command Prompt :

1. Start your Windows 7 Computer or Laptop.
2. Search for 'CMD'
3. Now right-click on CMD and then click on Run As Administrator to run the command prompt in Administrator Mode.

How To Fix Copy Of Windows Not Genuine Error

4. Now type the SLMGR –REARM command on Command Prompt and press Enter button to execute the operation.

Solve Windows 7 Not Genuine Error

5. Now a message shows that command is completed and your system is need restart to complete the command properly.So restart your Windows 7 Computer or Laptop and after restarting your Windows 7 becomes genuine and 'This copy of Windows is not genuine' error will removed from your Computer or Laptop.


Now your Windows 7 Pc or Laptop is becomes genuine.So if you face any problems in making your Windows 7 genuine using command prompt then comment below or contact us by visiting our contact us page.If making Windows 7 genuine is not working for you then you can also use Remove WAT Utility to make your Windows 7 genuine.You can get download link and know more about it by Clicking Here.If you found this article helpful then share it with your friends and other Windows 7 users that are facing this problem.

Monday, 3 February 2014

Download Whatsapp For Pc Without Using Bluestacks - Windows 8.1/8/7/XP

download whatsapp for pc
Whatsapp is a most popular messaging application in the World.It is available for Android,iPhone, Blackberry ,Window Phones and Nokia smartphones.Generally, It is not available for computers and laptops but you can use this messaging app on your computer having windows 8,windows 7 and windows XP by reading the methods given below.Last month,I share a article with you to How to run Whatsapp on computer with Bluestacks but our reader thought that Bluestacks required a minimum of 2 GB RAM and a good graphic card.So today I am sharing an article with you to How to use Whatsapp on your Pc having Windows 8.1,Windows 8,Windows 7,Windows XP and Windows Vista without using Bluestacks.

Method 1 : Install WhatsApp On PC Using Youwave Android Emulator :


Youwave is a powerful application to run android apps and games on your computers or laptops.You can also run the all android games and applications by using Bluestacks android emulator,But in order to install Bluestacks android emulator you need at least 2 GB of Ram and a graphic card.So if your computer's RAM is more than 2 GB then you can run Whatsapp on your PC by reading a article to install Whatsapp on PC.But if your computer's RAM is less than 2 GB then your can run Whatsapp in your computer or laptop by reading the steps given below.


1. Download and install Home version(10 day trail) of Youwave Android Emulator.
2. Open the trail version of Youwave in your computer or laptop.
3. Now click on View > Online Content and then click on Whatsapp in Online Apps.If you not find Whatsapp in Online content then you can look for it on app stores.

4. After downloading Whatsapp,Go to View > Apps and click on Whatsapp to run it on your computer or laptop.
5. Now click on Agree & Continue.
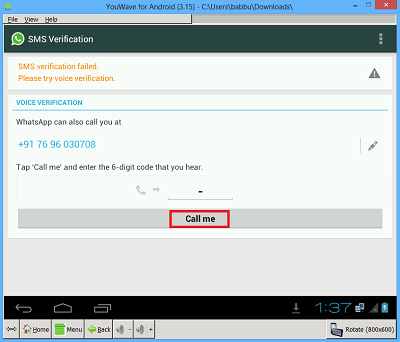
6. Select your Country and enter your Mobile Number as shown in image below.

Install whatsapp on pc

7. If your mobile number verification is failed via SMS then click on Call Me button.

whatsapp download for pc and laptop

8. After clicking on Call Me button,You will receive a phone call on your mobile.Hear the verification code and enter it on your computer/laptop screen.
9. Now enter your name and you will successfully install Whatsapp on your PC.

In starting,Their are no contacts available in your Whatsapp account because you are not using the Whatsapp on your smartphone.But you can add the contacts on your Youwave Whatsapp account manually.

Method 2 : Run Whatsapp On Your Pc By Using Wassapp Client :

free download whatsapp for pc

1. Download and install Wassapp Client on your computer/laptop by clicking here.
2. Open Wassapp Client in your Pc.
3. Now Log in on Wassapp Client with your Whatsapp account.If you not know about your Whatsapp account password then click on What is my password ?.


Now you can easily use Whatsapp on your computer or laptop by using one of above methods.So if you face any problem in using Whatsapp on your Pc then comment below or contact us by visiting our Contact us page.If you found this article helpful then share it with your friends and other peoples.

Thursday, 23 January 2014

How To Install Android 4.3 Jelly Bean OS On PC/Laptop

Android is becoming a popular operating system.Many peoples want to buy a android phones because their are many applications and games are available for it.But some of those peoples not have enough money to buy a android smartphone so today I am sharing an article with you to How to run android apps and games on PC without using Bluestacks and all other android emulators.

Required Downloads :
VirtualBox - Download Here
Android 4.3 Jelly Bean ISO - Download Here


1. Open VirtualBox in your computer.
2. Click on New button.
3. Type the information below in shown dialog box and click on Next button.

  • Name: Geniushelper.org
  • Type: Linux
  • Version: Other Linux

4. Now enter the memory(RAM) in shown dialog box as you wish but note that minimum memory required for android 4.3 Jelly Bean is 512 MB.

how to install android on pc

5. Now click on Next button.
6. In this step you will need to create a virtual Hard drive for your android 4.3 Jelly Bean operating system.Now select Create a virtual hard drive now and then click on Create button.

how to install android on pc

7. Now select VDI (VirtualBox Disk Image) and click on Next button.
8. Now select Dynamically Allocated or Fixed size as you wish and click on Next button.
9. In this step you need to select size of your virtual hard drive and note that minimum size of virtual hard drive is 1 GB or 1024 MB.Click on Create button to create a virtual hard drive for your android operating system.
10. Now right-click on Geniushelper.org and then click on Settings.

How To Install WhatsApp On Pc Without Bluestacks

11. In Settings,Click on Storage > Empty.In Attributes,Select ISO file of Android 4.3 Jelly Bean which you downloaded in starting of article and tick Live CD/DVD.Click on OK button to finish task.

Run Android Apps And Games on Pc

12. Again right-click on Geniushelper.org and click on Start button.

Run Android Apps On Laptops

13. Now click on Install Android X86 to Harddisk and select Create/Modify Partitions.


14. In this step,Create a new bootable partition by clicking on New button and then click on Primary button.


15. Now click on Write button and type Yes to write partition table to disk after that simply click on Quit button.


16. Click on sda1 and then select ext 3 as shown in images below.


17. Now select Run-Android-X86 to run the Android 4.3 Jelly Bean operating system on your computer.


Now Android 4.3 Jelly Bean is install on your computer and you will able to run all android apps and games on your PC without using any emulator.So if you face any problem in installing Android 4.3 jelly Bean operating system to computer then comment below or contact me by visit our contact us page.

Thursday, 16 January 2014

How To Run Android Apps And Games On Pc

How To Play Android Games On Pc For Free
Today Android is becoming a very popular operating system because there are millions of apps and games available for it.Generally,Android OS is available for touchscreen smartphones and tablets but you can run any Android apps or games on your PC for free.I see many peoples that have PC and want buy android smartphones or tablets for just playing games and running apps.They all waste their money for buying an android smartphones so today I am sharing an articles with those peoples who want to play android games on their PC.You can run all android apps or games on Windows or Mac operating systems by using Bluestacks App Player android emulator.


How To Play Android Games On PC/Mac :

1. Download and install Bluestacks App Player on your PC/Mac.
2. Click My Apps and select App search from shown apps.

Run Android Apps On Pc

3. Now  Bluestacks App Player will ask you to complete two steps.In second step Bluestacks will asks you to Login with your Google account and note that if your Google account password is in capital letters then use Virtual Keyboard located at bottom.
4. Search for your favorite games or apps and click on Install button to install your favorite apps or games on your PC/Mac.
5. Now go to My Apps and click on any installed apps or games which you want to play on your PC/Mac.You can play any Android games on your computer by using keyboard and mouse.


Now Bluestacks App Player is best Android emulator available for windows.You can easily play any games like Temple Run,Subway Surfers on your PC/Mac by using Bluestacks.But if Bluestacks android emulator not works perfectly on your PC/Mac then you can use other android emulators like Genymotion and Youwave.So if you face any problem in installing and downloading Bluestacks app player android emulator then comment below or contact us.

Tuesday, 14 January 2014

How to Add Start Menu or Button in Windows 8

Windows 8 is comes without Start button,So windows 8 users face many problems in finding and opening any problem.But we can add beautiful Start menu on windows 8 by using a application software called Start Menu 8.This software removes modern UI start screen from your windows 8 PC and add start button in your windows 8 taskbar.If you use this software on your windows 8 then you can boot your PC or laptop directly to desktop.


How To Bring Back Start Menu In Windows 8 :

1. Download and install latest version of Start Menu 8.

How to Add Start Menu or Button in Windows 8 RTM

2. After installation is completed,Click on Style tab and select style of your windows 8 start menu as shown in figure below.

how can i Put start button in windows 8

3. Now click on Start Button tab in left side and select logo of your windows 8 start button.


4. Now click on User Interface and select your photo to show in start menu.
5. Now click on Apply button to apply all settings and then click OK button.


Now Start menu is start showing on left side of your windows 8 taskbar. You can customize all parts of this Start menu by going to settings of Start Menu 8.The best feature of this program is that you can customize logo of start button.This start button works very fast than all other start menu programs.So if you face any problem in adding this start menu to your windows 8 then comment below or Email me by visiting our Contact us page.

Sunday, 12 January 2014

How to Make windows 8/8.1 Look Like Windows 7

Windows 8/8.1 is launched on 2013,But many peoples don't like windows 8 because it not have start button and transparent title bars.Now you can make your windows 8/8.1 look like windows 7 by following all steps given below.These steps are very simple and easy so everyone can make their windows 8/8.1 look and feel windows 7 or windows vista.


Step 1:How To Add Start Button To Windows 8 :

The Start button is most beautiful and usable feature of windows 7 so in first step we need to add a start button and remove start screen from your windows 8.Steps to add add start button to your windows 8 are given below.

1.Download and install latest version of Classic Shell from here.
2. After installing Classic Shell,Start button is start appearing in lower left-hand corner of your Windows 8 or 8.1 taskbar.

How To Add Start Button To Windows 8/8.1 For Free

3. Now if you want to select style of Start button then right click on Start button and single click on Settings.


Step 2: Installing Windows 7 Aero Theme in Windows 8 or 8.1 :

Many peoples says that theme of windows 8 or 8.1 is very boring and solid so in this step we need to change theme of your windows 8/8.1 with default theme of windows 7.Steps to install windows 7 default theme(Aero theme) in your windows 8/8.1 are given below.

1. Download and install UxStyle.
2. Download windows 7 Aero 8 theme zip file from Deviant Art and extract it.
3. Copy the files of Theme folder from extracted zip folder and paste those files in C:\Windows\Resources\Themes.
4. Now right click on your desktop and single click on Personalize.
5. Select Aero 8 from installed themes.Now you will see that your windows 8/8.1 theme is changed with windows 7 default theme.


Step 3: Adding Aero Glass Effect To Window Title Bars In Windows 8/8.1 :

The title bars and borders of windows 8/8.1 are very opaque.So in order to make the window title bars transparent you need to install WinaeroGlass in your windows 8/8.1.Steps to install WinaeroGlass are given below.

1.Download and extract WinaeroGlass to your windows desktop.
2. Enable visual effects of WinaeroGlass by double clicking on Winaeroglass.exe.
3. Copy WinaeroGlass.exe to C:\ProgramData\Microsoft\Windows\Start Menu \Programs\Startup folder to make this program start every time when your system starts.

Now you windows 8/8.1 title bars become very beautiful and transparent.

Step 4: Removing Lock Screen From Windows 8/8.1 :

Windows 8/8.1 lock screen did not creates much problems,But if you want to remove this lock screen from your windows 8/8.1 then follow the steps given below.
1. Open Run by pressing Windows+R.
2. Enter Regedit on Run and press Enter button.

How To Remove Lock Screen From Windows 8/8.1

3. Navigate to HKEY_LOCAL_MARCHINE\SOFTWARE\Policies\Microsoft\Windows.
4. Now create a registry key called Personalization by right-clicking on window and then selecting New.
5. Now right-click on window in Personalization folder and create a new DWORD value and rename it with NoLockScreen.
6. Now double click on NoLockScreen DWORD and enter the value 1 in the appeared dialog box.

How To Change Windows 8/8.1 Look With Windows 7

7. Now close the Regedit window and restart your computer.

Step 5: Running Windows 8/8.1 Metro Style Full Screen Apps In Desktop Mode :

Many peoples says that multi-tasking is almost impossible in windows 8/8.1 because their is no start menu available in windows 8/8.1 and users need to go to Modern UI Start screen to launch any apps.So if you want run windows 8 style apps on your desktop then follow the steps given below.

1. Download and install ModernMix on your windows 8/8.1.You can use trail version of ModernMix for only 30 days so i recommend you to buy a full version.
2.Now open ModernMix and select Windowed Mode.If you select Windowed mode then all windows 8/8.1 metro style apps will open on your windows 8/8.1 desktop.
3. Now select "Never return to the Windows 8 menu when I close applications" from Advanced Tab.
4. Close the ModernMix.

Now all your windows 8/8.1 style apps will open on your desktops.Enjoy windows 7 look on windows 8/8.1 for free.


If your face any problem in applying all these steps then comment or contact us by visiting our contact us page.If you like this article then share it with your friends.

Monday, 6 January 2014

Easily Use Your PC's Internet Connection On Android Phones Via USB

How To Use Your Pc's Internet With Android Mobile Through A USB
Many peoples don't have internet connection available on their Android phones,But they have very fast internet connections available on their computers or laptops.So today i am sharing to How to use laptops or computers internet connection on Android phones through a USB data cable.

Most of Android users know about USB or Wi-Fi tethering.In Android tethering you can share your Android phone's internet connection with other Android devices.But most of Android users are not know about Reverse Tethering.

In Reverse Tethering,You can use your PC's internet connection in Android phone through a USB data cable.In this you don't need a Wi-Fi router on your computer because it transfer all the data from your computer to Android phone through a USB data cable.

Requirements For Sharing PC's Internet Connection With Android Device:
1. A rooted Android phone.
2. Download Android Reverse Tethering Tool from attachments section of this thread.
3. Your Android phone's drivers should be installed on your computer.You can download these Generic drivers from Google.
4. Ensure that you have USB Debugging enabled on your Android phone.You can enable USB Debugging on your Android phone by Tapping Settings >> Applications >> Development >> USB Debugging >> Turn On.

For Android phones running Android 4.3 JellyBean or later you can enable USB Debugging by Tapping Settings >> Developer Options >> Android debugging >> Turn On.


How To Share Your PC's Internet Connection With Android Phone:
Step 1. Connect your Android phone with your PC using USB data cable.
Step 2. Extract downloaded ReverseTethering_3.18.Zip on your PC.
Step 3. Now run AndroidTool.exe on your PC from extracted ReverseTethering_3.18 folder.


Step 4. After opening Android Reverse Tethering,Select your Android phone from Select A Device drop down list and select a DNS from Select DNS to use drop down list.


Step 5. Now click on Connect button and utility will start installing required apps on your Android phone.If utility crashes while installing required apps then run it again.
Step 6. After all required apps have installed on your Android phone,Click or Tap on Grant button in Superuser prompt to allow USB Tunnel App on your Android device.

Now you can easily share your PC's internet connection with your Android phone via USB and your window application will show stats of running internet connection.Sometimes while surfing internet on your Android phone a No Internet Connection will show.Don't worry about this message and click on OK button.