Showing posts with label Internet Tricks. Show all posts

Friday, 26 September 2014

Google Announces Release Date of Google Panda 4.1

Google Panda is an algorithm started by Google to lower the rank of Low Quality Sites on Google Search Results.It was first released on February 2014.In starting,Google rolls out the Google Panda updates on Monthly Basics.Every Webmaster and Blogger is getting ready for next Google Panda Updates.Many Peoples are spending thousands of Dollars to protect their Blogs and Websites from Google Panda Penalty.Today Google announces the update of Google Panda 4.1.This update will help the Small or Medium size Blogs to get better ranking on Google Search results.


When Will Google Panda 4.1 Release :

Pierre Far of Google UK,Announces that Google Panda 4.1 Update will start rolling out this week.This Google Panda Update will effect 3-5% of Search Quires.You can checkout Google Plus Post of +Pierre Far Here.This update will work slowly and effect all the Search quires within 1 week.

Is My Site Hit By Google Panda or Not :

If Traffic of your Blog or Website is suddenly decreased from Google then you're surely affected by Google Panda.If ranking of your Website or Blog is decreased on many keywords then you're also affected by Google Panda.You can check the change in ranking of your Websites and Blogs by going to Google Webmasters Tool.

Will I Recover From Google Panda Penalty :

Many Blogs and Websites are affected by Google Panda 4.0 on May,2014.According to SearchEngineLand,7.5% of English Search Quires are affect by Google Panda 4.0.So many Bloggers and Webmasters work very hard to recover from Google Panda and in upcoming few days their Blogs and Websites may be recovered from Google Panda Penalty.

How To Get Ready For Google Panda 4.1 Update :

Google Panda mostly affect Sites and Blogs that has Spammy and Low Quality Backlinks.So you can save your Sites or Blogs from being affect by Google Panda by removing Low Quality and Spammy Backlinks.You can remove low Quality Backlinks using Google Disavow Tool.

Google Panda 4.1 will affect all the Low Quality Sites and Blogs.If you're affected by Google Panda then Contact us.We will help you to recover from Google Panda Penalty.If you found this article helpful then share it with your Friends.

Saturday, 6 September 2014

How to Turn Your Pc/Laptop into Wi-Fi Hotspot

Turn Your Pc into a Wi-Fi HotspotIn these days,Almost every Person want to use Internet on their Phones and Computers.So today I'm sharing an article to How to Turn your PC into Wi-Fi Hotspot.There are many Applications are available For Windows 7 and Windows 8 to Turn PC into Wi-Fi Hotspot But you can easily turn your PC into Wi-FI Hotspot by using an Application called 'MyPublicWifi'.This application is Freeware and available for free on official Website.You can download the application easily without paying any Money.If you want to turn your Pc or laptop into a Wi-Fi Hotspot then follow the steps below.

Requirements To Turn PC/Laptop into Wi-Fi Hotspot :


  • A PC or Laptop
  • MyPublicWifi Application
  • Your Pc Should Run on Windows 7,Windows 8 or Windows 8.1.

How To Turn Your Pc or Laptop Into Wi-Fi Hotspot :

You can turn your PC into a Wi-Fi Hotspot by using an application called 'MyPublicWiFi'.This application is Freeware and available for Windows 7,Windows 8 and Windows 8.1.

1. First of all,Download the 'MyPublicWifi' for your Pc or Laptop by Clicking Here.
2. Install it on your PC or Laptop and don't forget to restart to PC after installation is completed.
3. Now right-click on 'MyPublicWifi' icon from Desktop and then click on 'Run as Administrator' to run the Application as Administrator.
4. Now click on 'Stop Hotspot' button.
5. Now click on 'Automatic Hotspot Configuration'.

How To Create Wi-Fi Hotspot in Windows 7 and Windows 8

6. In Network Name(SSID) Field,Enter the Name of your Wi-Fi Hotspot.
7. In Network Key Field,Enter the Password of your Wi-Fi Hotspot.
8. After completing all above steps,Click on 'Set up and Start Hotspot' button.

Now you can use your Pc or Laptop Internet on your Phones and other Devices.You can see the list of connected Devices by clicking on 'Clients tab.You can Manage your Wi-Fi Hotspot by selecting 'Management' tab.


Now you can turn your PC or laptop into a Wi-Fi Hotspot by following all above steps.If you face any problem or have any doubt then comment below.If you found this article helpful then share it with your Friends.

Friday, 5 September 2014

How To Download Instagram For PC

How To Download Instagram For PC
Instagram is an online Social networking service that allow us to capture Photos/Videos and share them on many popular Social networking sites like Facebook and Twitter.The Instagram application is available for only Mobile Devices and we can't Download Instagram for Pc or Mac.So peoples face many problems because most of Peoples use Social networking sites on their PC rather than Mobile phones.So I'm sharing an article to How to Download Instagram For PC running on Windows 8,Windows 8.1 and Windows 7.So if you want to download Instagram for your Pc then you can use below Methods.

Method 1 : How To Download Instagram For Pc Using Pixsta :

How To Download Instagram For PC

Pixsta is a free app that allow us to access the Instagram on our Computers and Laptops.Using the Pixsta,You can view,share and discover beautiful Photos from Instagram on your PC.You can also download the Instagram Photos directly on your PC.You can also comment and like the Photos of others.If you want to use Instagram on your Pc using Pixsta then follow the step below.

Steps to Download Instagram on Pc using Pixsta :

1. First of all,Download Pixsta on your Pc by Clicking Here.
2. Now install it on your Pc.
3. After initialization is completed,Open it.
4. Now Log in with your Instagram account.

After completing all the steps,You can Instagram on your Pc without any problems.If you don't have Instagram account then you can create that by using your Friend's Android or iPhone.If

Method 2 : How To Download Instagram For Pc Using Bluestacks :

Bluestacks is best Android Emulator of the World for Windows 7,Windows 8 and Mac.It is used by millions of peoples for running Android applications on their Computers and Laptops.In Bluestacks,Downloading and Installing the Apps is much easier than all other Android Emulators.So now we will use Bluestacks to run Instagram on PC.You can download and install the Instagram on your PC using Bluestacks by following below steps.

Steps To Download Instagram For Pc Using Bluestacks :

1. Download the Bluestacks App Player on your Pc by visiting www.bluestacks.com.
2. Now Install Bluestacks App Player on your PC.
3. Now Open it on your PC.
4. Now click on Search button and search for 'Instagram'.
5. Now click on Instagram app.
6. Now Google Play Store will open.Here you'll need to click on Install button to install Instagram on your PC.

Now Google Play Store will start downloading the Instagram app on your Pc and after downloading is completed,Bluestacks will automatically install the Instagram app on your PC.

Method 3 : How To Use Instagram On PC Using Webstagram :

Webstagram is best Instagram Web Viewer of the World.Using Webstagram,You can view the Photos of Peoples you're following.You can also Like and Comment on their Photos.You can browse the popular Users and able to Follow them.You can also Unfollow them at any time.You can also view the popular Photos from Hash tags.You can use the Instagram on your PC using Webstagram by following below steps.

Steps To Use Instagram On PC Using Webstagram :

1. Visit Webstagram's Official Website www.websta.me.
2. Click on Log in button.
3. Now Log in using your Instagram Username and Password.
4. After entering the Username and Password,You'll be redirect Instagram's Website.Here you'll need to click on Authorize button to Instagram on your PC.

Now you can also use the Instagram on your PC using Webstagram.If don't have an Instagram account then you can create one from your Android or iPhone or you can use your Friends Phones for creating an Instagram account.

Method 4 : How To Use Instagram on Pc using Instagram's Website :

Officially,Instagram don't allow us to use Instagram on PC or other Device,But by using the easiest trick you can use the Instagram on your PC,laptop and Mac.So if you want to use the Instagram on your PC using Instagram's Website then follow the below steps.

Steps To Use Instagram On PC Using Instagram's Website :

1. Type the below Web address in your Browser's Address Bar and Replace the Username with Instagram Username.


www.instagram.com/username
2. After your Instagram Profile is opened,Log in using your Instagram Username and Password.

Now You can download Instagram for your PC and if you face any problems in installing Instagram on PC then comment below or Contact us.If you found this article helpful then share it with your Friends.

Tuesday, 2 September 2014

How To Block Websites In Google Chrome

Block Sites on Google Chrome
Google Chrome is most used web-browser of the World and according to StatCounter,It is used by almost 45% of peoples in May,2014.So today I'm sharing an article to How to block websites in Google Chrome.Peoples from all around the World want to block Websites on Google Chrome because of many reasons.In most cases peoples block Websites on Google Chrome so that their kids always be safe from harmful sites and many Peoples block Websites on their Google Chrome browser so that they can concentrate on their Work.You can block the Websites on your Google Chrome Browser by installing 'Block Site' extension.This Google Chrome extension was created by wips.com.This Chrome Extension is available in both Free and Paid version.Features of Free version are same as Paid version but Free version doesn't allow us to stop Peoples from uninstalling the Extension or Google Chrome Browser.So if you want to block Websites on your Google Chrome Browser then follow the steps below.

How To Block Websites on Google Chrome Browser :

1. First of all install Block Site Extension in your Google Chrome Browser.You can install the Block Site extension in your Google Chrome Browser by Clicking Here.
2. Now open Extensions page on your Google Chrome.You can open the Extensions page by typing chrome://extensions in Address bar.
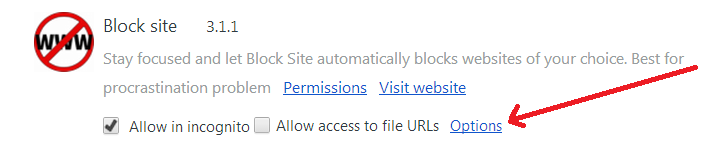
3. Now go down to Block Site extension and tick the check box 'Allow in Incognito' to allow the extension in Incognito window.

How To Block Specific Sites on Google Chrome

4. Now click on Options.


5. Now enter URL of the Website which you want to block and then click on Add Page button.

Website Blocker For Chrome


Now you can block the Websites in your Google Chrome Browser easily without spending much time.Now if anyone will try to visit blocked website then Block Site extension will show 'Site Blocked' error.Instead of showing error page,You can also redirect the them to specific Websites by entering the website URL in Default Redirect Page.

Website is blocked

You can also Protect the Uninitialization of Extension or Google Chrome Browser by buying its Premium account. This Google Chrome extensions also allow us to block Websites for specific Days and Time.

Now if you face any problem in blocking Websites on Google Chrome Browser in Windows 8.1, Windows 8 and Windows 7 then Comment below.If you found this article helpful then share it with your Friends by using below sharing buttons.

Thursday, 28 August 2014

Top 5 Android Phones Under 10000 Rs.

In these Days,Everyone want Big and Good Phones.So today I'm sharing Top 5 Android Phones under 10000 Rs. These Phones are selected by our Team Members.You can blindly buy one of these Phones because these are best Android Phones under 10000.These Android Phones are manufactured by Popular Companies like Motorola and Nokia.You can checkout the best Android Phones under 10000 Rs. below.

Top 5 Best Android Phones Under 10000 Rs. :

1. Moto G (8 GB) :
Best Android Phones Under Under 10000

Moto G is one of the best Android Phone of 2014 under Rs. 10000.It is developed and Manufactured by Motorola Mobility.It was released on 13 November 2014.It comes with 1 GB of RAM and 1.2 GHz Quad Core Qualcomm Snapdragon 400 Processor.After Six Weeks of its launch,It becomes the best selling Phone of Motorola.It is an Dual SIM Android Phone.The Moto G comes with Stock version of Android 4.4 Kitkat.This Phone comes with 5 MP of Primary Camera and 1.3 MP of Secondary Camera.If you're looking for an Android Phone with best specifications then I recommend you to buy this Phone.Motorola's Moto G is only available on Flipkart and You can't buy it from Shops.You can checkout Pros and Cons of Moto G below.

Pros :
Excellent Features
Android 4.4 Kitkat OS
1 GB
Quad Core Processor

Cons :
Uninspiring Design
No Memory Card Slot

2. Asus Zenfone 5 A501CG (8 GB) :
Top 5 Android Phones Under 10000

Last Moth,Asus launched 3 new Smartphones in India through Flipkart and one of them is Asus Zenfone 5(8 GB).This is an great Android Phone under Rs. 10000.It comes with 2 GB of RAM and 1.6 GHz Dual Core Processor.The Android Phone comes with 5 Inch HD Display and it is very Sensitive ever you can use it while wearing the Gloves.This Android Phone comes Corning Godzilla Glass 3 so you'll not to worried about Screen Break.Asus Zenfone 5 runs on its own ZenUI.Overall,THe Quality of Device is very impressive.You can checkout Pros and Cons of the Asus Zenfone 5(8 GB Version) below.

Pros :
Large HD Display
2 GB RAM
Good Processor
Great Camera
Latest Android 4.4 Kitkat OS

Cons :
Non Removable Battery


3. Gionee M2 :
Top 5 Android Phones Under Rs. 10000

Gionee M2 is also very good Android Phones under 10000 Rs.It comes with 5 Inch Display and 1 GB of RAM.It is Powered by 1.3 GHz Quad Core Processor.Like Motorola Moto G,It also Supports Dual SIM Cards.It is Powered by massive 4100 mAh Battery.The Design and Performance of Gionee M2 is very impressive as compared to other Phones.You can also use Gionee M2 as Power Banks for charging the other Devices.You can checkout Pros and Cons of Gionee's M2 below.

Pros :
Bigger Screen Size
Powerful configuration
Massive Battery
Power Bank Feature
Good Camera (8 MP Primary and 2 MP Secondary)

Cons :
Low Resolution Display
Low Internal Memory

4. Nokia XL :
New Android Phones Of 2014 Under 10000

Nokia XL is also very good Android Phone under 10000 Rs. as compared to other Phones.It comes with 768 MB of RAM and 5 Inch Display.It is Powered by 1000 MHz Dual Core Processor.The Primary Camera of the Phone is 5 MP and Secondary Camera is 2 MP.The Battery of the Phone is 2000 mAh and Battery Backup of the Phone is very well.The Nokia XL is runs on forked version of Android Some Apps like Google Play and Whatsapp may not work.The Internal Memory of the Phone is 4 GB and You can expand it for upto 32 GB using Memory Card.You can checkout Pros and Cons of Nokia XL below.

Pros :
Large Display
Good Battery Backup
Fastlane
Good Camera

Cons :
Low Internal Storage
Some Apps May Not Work
Low Quality Display

5. Sony Xperia M :
Best Android Phones Under 10000

Sony Xperia M is very Android Phone under 10000 Rs from Sony.It comes with 5 Inch Bright and High Quality Display.It runs Android 4.1 Jelly Bean OS and it is upgradeable to Android 4.3 Jelly Bean OS.It is Powered by Qualcomm® Snapdragon™ S4 Plus processor.Sony Xperia M2 comes with 5 MP Primary Camera and VGA Secondary Camera.It is available in Black,White and Purple Colours.You can checkout Pros and Cons of Sony Xperia M below.

Pros :
Beautiful Design
Bright and HQ Display
Good Primary Camera

Cons :
Old OS
VGA Front Camera

These are Top 5 Android Phones under 10000 Rs.You can buy one of above Best Android Phones under 10000 Rs.You can buy these Phones on Online and Offline Stores.If you have any doubt then comment below.

Friday, 1 August 2014

How To Add All Facebook Friends To Facebook Group at Once

We all know that Facebook is best Social Networking Site since its creation and Almost every Internet User have a account on it.Since now,Many Facebook Groups Admin don't know to How to Add All Facebook Friends to Facebook Group in Single Click.So today I am sharing an article to Invite all Facebook Friends To Facebook Group without their Permissions. Actually,This this trick of inviting all Facebook Friends to Facebook Group is created by Iftekhar Ahmed of Iftiseo and I'm just sharing it with You.You just need to Paste the code Console Window of your Browser for Adding all Facebook Friends to Facebook Group.After you'll Paste the Code the script will start working and automatically start adding your Facebook Friends to your Facebook Group.It is best to Increase Members of Facebook Groups.Many Facebook Groups Admin have very less number of Members to their Facebook Groups and they can use this trick to increase their Facebook Group's Members.You can add your Facebook Friends to your Facebook Group in Single click by following the below steps.


How To Invite All Facebook Friends To Facebook Group :

1. First of all,Open the Facebook Group in which you want to add your Facebook Friends.
2. Open Developers Window by Pressing F12 button.You can open the Developer Box by Right-clicking on anywhere and then selecting Inspect Element and then selecting Console option from top Tabs.
3. Now copy the Code from Here.
4. Now Paste the Code in Console Window and Press Enter button to Proceed adding Friends to Facebook Group.After 5-10 Seconds,All your Facebook Friends will be added in your Facebook Group with their Permissions.

Note : If you have large number of Friends in your Facebook account then It may take 2-3 Minutes for Adding Friends to Facebook Group.


Now you can add all your Facebook Friends to your Facebook Friends without any Problems and if the code don't work then comment below or tell us so that I can update the code.If you found this article helpful then you can share it without your Facebook Friends.

Thursday, 10 July 2014

Top 5 Best Webmail Softwares

Webmail is a email client implement as Web application and you can access this from any Web Browser.The most used and popular Email Clients are AOL,Gmail,Outlook and Yahoo Mail.In 90s, Implementing the Webmail is very difficult but now its very easy and anyone can Implement in on their Websites.The main advantage of Webmail is that you can send and recieve the Mails directly into your Browser.The Webmail Providers give email access using Webmail Client or Desktop Email Client.The mails send and received by Peoples are easy readable by Email Service Providers because Emails are stored in their Servers.So after knowing the importance of Webmail in Internet,I'm sharing Top 5 Free Best Webmail Software.You can checkout list of Top 5 Webmail Software below.

Top 5 Best Webmail Softwares :

1. Roundcube :
Roundcube is an Free Open Source Webmail.It is very easy to Implement and Configure.It is available in over 70 Languages.It offers variety of Features to their users.You can checkout its System requirement and many more information by clicking here.

2. Zimbra :
Zimbra is one of best Webmail Software of the World.It is a Web Browser based Ajax client.You can checkout its Features and other Information by clicking here.

3. Atmail :
Atmail is also one of best Webmail Software of the World because of its Features and Pricing.It is also comes with Trail version that means you can also test its Features.You can checkout its Features and Pricing by clicking here.

4. SquirrelMail :
SquirrelMail is a standard based Webmail and it is written in Php.It is not much popular in Peoples but its Features are really well and you can use it without any Problems.Its support HTML 4.0 and no JavaScript is required.You can checkout its Features and Pricing by clicking here.

5. HastyMail2 :
HastyMail2 is Full-featured IMAP/SMTP client and it is written in Php.Its very fast,Secure and compliant Web mail client.Its is very Good Webmail software but it requires Php 5.You can checkout its Features and other information by clicking here.


These are Top 5 Best Webmail Software of 2014 and You can use them on your Websites.If you face any problem related to Webmail then comment below or Contact us.If found this article helpful then you should share it with your Friends.

Friday, 20 June 2014

Top 10 Free Online Photo Editors of 2014

In these days,Everyone want to share his/her Photos to Social Networking sites like Facebook and Twitter.But editing the Photos for uploading is not easy and But now you can edit and enhance your Photos easily by using Free Online Photos Editors.By using these online Photo Editors,You can change Backgrounds of Photos,Resize etc.You can check list of Top 10 Free Online Photo Editor Below:
top 10 best online photo editor site 2014

Top 10 Free Online Photo Editors of 2014 :

1. Online Photoshop Free photo Editor :
It is very good and powerful Photo Editor to edit and customize your Photos.It has all the latest features of Adobe Photoshop, Anyone can edit their photos on the fly. It's free and is having really awesome interface. Its very Easy to Use and anyone can use it.

2. Pixlr :
Pixlr is one of best Online Photo Editor for editing the photos and adding special effects to them.The thing that I like in this Online Photo Editor is it is completely Free and you don't required any account for editing the Photos.Pixlr contains three tools for editing your Photos.First tool is Pixlr Editor which is used for editing Photos,Second tool is Pixlr Express which is used to Add Effects,Overlays and Borders to your Photos.Third tool which Pixlr-O-Matic is also work same as Pixlr Express.

3. Photoshop Express :
Adobe Photoshop is best software of the World for editing the Photos.But Photoshop is very difficult to use so Adobe added a simple and easy tool to their Website called Photoshop Express.By using Photoshop Express,You can edit and enhance your Photos.Photoshop Express is also available for iPhone that means you can also edit your Photos on your iPhone.

4. PicMonkey :
PicMonkey is also very good Online Photo Editor.By using PicMonkey,You can Edit,Touch Up,Design your Photos.If you has collection of many Photos then you can also create collage from them.You can remove ads from this Online Photo Editor by upgrading your account.

5. FotoFlexer :
FotoFlexer is Most Advanced Photos Editors of the World and Peoples use it to edit and enhance their Photos without any Problem.It has many Pros and many Cons but overall its very Good Online Photo Editor and you can use it for editing your Photos online.

6. LinaPic :
LinaPic is an Online Photo Editor that allow use to Edit our Photos.Using LinaPic,You can Edit your Digital Photos and add tons of effects to them.You can also create animations from your Photos by using this Online Photo Editor and one more thing it is completely free that means you can edit your Photos without paying anything.

7. SplashUp :
SplashUp is also very Good Online Photo Editor and You can edit your Digital Photos easily by using it.Like other Online Photos Editors,SplashUp is also Integrated with social networking sites like Facebook and Twitter which allow us to easily import the Photos.

8. Online Image Editor :
Online Image Editor is a tool that allow us to edit our Photos and personalize them.It has many tools to edit your Photos and make them look professional.Like LunaPic,You can also create animations from your Photos by using this Online Photo Editor tool.

9. Phixr :
Phixr is also the best online photo editor editor.It is mainly based on HTML.The Phixr has a good user interface.It is fast online photo editor online tool.You can done many things with your image like round your corner,you can also flip your picture easily.

10. Pho.to :
Pho.to is also the best online editor like other.It is also include in top 10 photo editor.It include many frames to edit your picture.you can easily make funny photo with this online editor.In this you can also filter or montages your pictures.


These are Top 10 Online Photo Editors of the World and you can edit your Digital Photos using these Online Photo Editors.If you face any problem in editing your Photos with these tools then comment below.If you like this article then you should share it with your friends.

Sunday, 15 June 2014

Top 5 Best Sites To Download Movies Absolutely Free

Best Sites To Download MoviesToday I am sharing Top 5 Best Sites To Download Movies for Free.These sites are very popular and you can download thousands of English, Hindi, Punjabi, Tamil, Telugu, Bengali and Marathi Movies.Using these Sites,You can download Movies for both Mobile/Tablets and Computers. These all Top 5 Best sites to download movies are rated by our Team and you can use these sites to download your favorite Movies.These sites also provide 300 MB Movies to save your Hard Disk Space.You can download Movies from these sites without any limitations and creating a account.So checkout Top 5 Best sites below to download latest Movies.


Top 5 Best Sites to Download Movies :

1. WWW.DIVXCRAWLER.INFO :

Divxcrawler is best site of the World to download latest and popular Hollywood movies.They update their collection of English Movies daily and provide you latest movies for downloading.It upload the Movies in DVD Quality and you can download the Movies within 30 Minutes(Depending On Your Internet Speed).This is a International site so they don't upload the Hindi,Tamil,Telugu,Punjabi etc Movies.But you can download the these Movies by below sites.If you're looking for Website to download English Movies then this is best Website for you.

2. WWW.HTTPFILM.COM :

HttpFilm is very good site to download latest Movies for Free.In this Website,You can download the Movies without any limits and creating a Account.It uploads the Action,Adventure,Comedy ,Horror etc all types of Movies.It also add the watch links to some Movies that means you can also watch the Movies before downloading.Like Divxcrawler,It also update their collection of Hollywood Movies daily.If you not like this Website for downloading latest Movies then you should check below sites.

3. WWW.FULLMOVIEZ.IN :

FullNoviez is also very popular Website for downloading Movies for both PC and Mobiles/Tablets.Her you can download Hindi,English, Bengali,Tamil, Telugu and Punjabi Movies without registering an account.Here you can also download 300 MB small size Movies which are very useful if your Computer's Harddisk is small.Here you can download the Movies in MP4,AVI and 3GP Format.If your PC/Mobile/Tablet not support these formats then you can convert the Movies into supported Format by using Video Converter.

4. WWW.MOVIESCRIB.COM :

MoviesCrib is also very Good Website for download latest Movies absolutely Free.Here you can download English,Hindi, Punjabi, Marathi and Hindi Dubbed Movies For Free.This Website has huge collection of both Bollywood and Hollywood Movies.This site supports all Three major Web-Browsers(Google Chrome,Mozilla Firefox and Apple Safari) to make your task of downloading Movies easy.This site also have a search box with which you can search your favorite movies and download them.

5. WWW.WORLDFREE4U.COM :

WorldFree4u is my favorite Website to download latest Hindi,Punjabi,English and Hindi Dubbed Movies.I always like to download the latest Movies from this site because they provide movies with Screenshots,Watch links and IMBD Rating etc.I already tell you that site gives both Download and Watch links that means you can watch your favorite Movies before downloading them.Like FullMoviez,They also provide 300 Small Size Hindi and English Movies.If you're Indian and likes to watch Indian Movies then this site is best for you because they mostly provide Movies for Indians.


These are Top 5 sites of the World for downloading latest Movies for Free.If you know about any other site to download latest movies then you should comment below.If you face any problem in downloading Movies then comment below.If you found this article helpful then you should share it with friends.

Friday, 13 June 2014

How To Use Google Maps In Offline Mode On Android,iOS

Google Maps is one of best mapping application of the World and Peoples likes to use this while travelling .Peoples use Google Maps instead of any other mapping application because it have very good features and it is available in App Stores for free.One Month ago,Google announced an update for Google Maps with which you can save your Maps Offline and use them at any location without any Internet cost.So today I am sharing an tutorial to How to Save Google Maps For Offline Use.The procedure of saving maps for offline use is same on Android and iOS .So if you want to save your Google Maps for Offline use then follow the steps given below.

Save Google Maps in Android And iOS For Offline Use

How To Save Google Maps For Offline Use On Android,iOS:

Step 1. First of all connect your Android or iOS Device to Internet.
Step 2. Now update your Google Maps app to its latest version.You can update your Google Maps by clicking on below links.If your Google Maps app is already updated to its latest version then you should skip this step and continue to 3rd step.
Step 3. Now launch the updated version of Google Maps and tap on Profile icon located to right of Search bar.

How To Use Google Maps in Offline Mode

Step 4. Scroll down to the bottom of the page.
Step 5. Now click 'Offline Maps' Mode and select the Maps area which you want to save for offline use.You can also save your maps for Offline use by viewing the maps area which you want to save and then typing 'OK Maps' into Search Box.

Points To Remember :

1. Saved Maps are only remain in your Android or iOS Device for only 30 days.After that your saved maps will be deleted and you will unable to view the Offline maps without Internet connection and You need to save the maps again for using them Offline again.
2. According to Google,You can save upto Six Offline Maps.
3. Some features of Google Maps like Satellite,Terrain, Indoor Maps and 3D buildings will not work in Offline Mode.


Now you can easily save your Google Maps for Offline use and you can access your saved Offline Maps at any Time without Internet connection.If you face any problem in Saving your Google Maps for Offline use then comment below or Contact Us.If you found this article helpful then you should share it with your friends.

Wednesday, 11 June 2014

How To Use Paypal To Buy Android Apps/Games From Google Play Store

Paypal is one of the best method of the World for processing the payments.But the main problem is that making payments in Google Play Store via Paypal is difficult.So today I am sharing an article to help you in buying Android apps and Games from Google Play Store via Paypal.This method of buying Android apps from Google Play via Paypal is only works for selected 12 countries including US,Canada and Germany.So if Google was not added a Paypal support in Google Play for your Country then you should wait for next Google Play update until Google adds Paypal support for your country.If you want to buy Android apps from Google play using Paypal then follow the below steps.


How To Buy Android Apps and Games Using Paypal :

Image Credit : Theverge

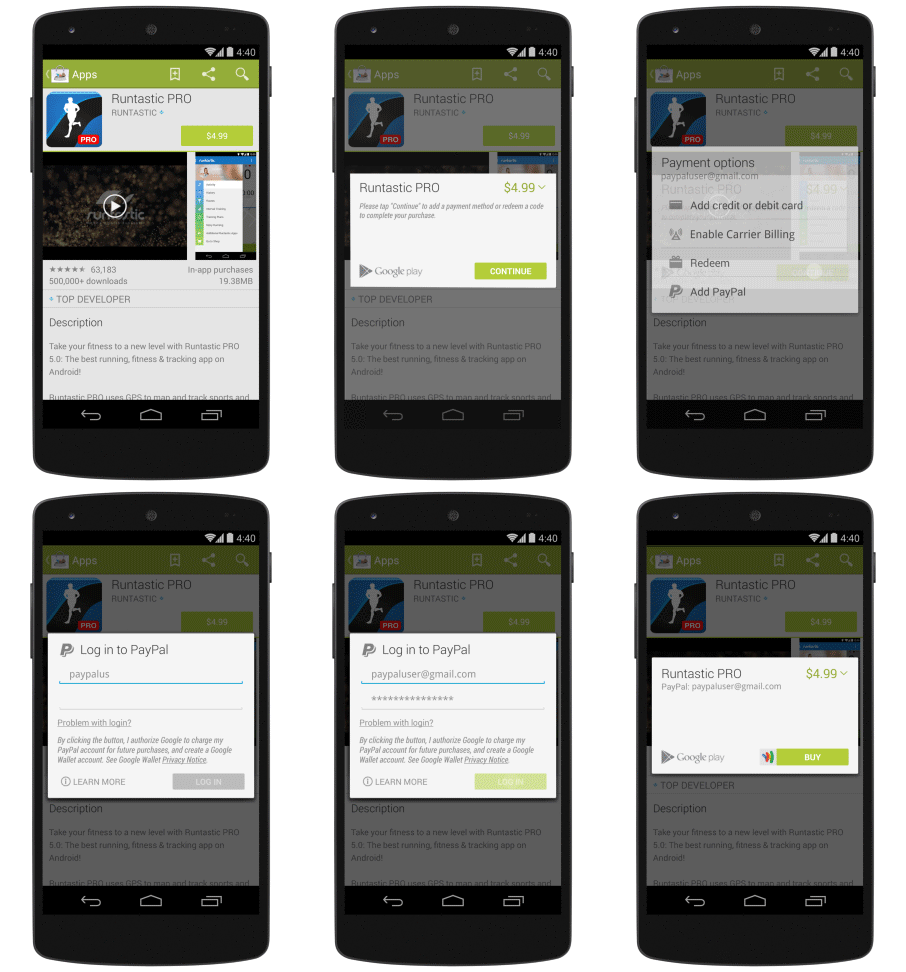
1. First of all,Open the App or Game which you want to buy using Paypal in Google Play Store.
2. Now click on Green coloured Price button and click on Continue button.
3. Now click on Add Paypal button to add Paypal as Payment Option.
4. Now login with your Paypal account details and again click on Buy button to buy your Android apps and Games from Google Play Store.

Now you can buy your favourite Android apps and games from Google Play Store using Paypal.But if you're using the Google Play Store in your Web-Browser then you should follow below steps to buy Android apps and Games from Google Play Store in your Web-browser.

Buy Apps From Google Play Store via Paypal In Browser :

1. Open the App or Game which you want to buy using Paypal in your Web-Browser.
2. Click on Buy button.
3. Now select your Android Device from Drop-Down List and click on Continue button.
4. Now type your Name and Location in Google Wallet Account.
5. Select Paypal as Payment Method and Sign in with your Paypal Account.
6. Now Paypal is added as your Payment Method and you can buy your favourite Android apps and Games from Google Play Store using Paypal.

Now you can easily buy your Android Apps and Games from Google Play Store via Paypal.If you face any problem in buying Android apps from Google Play using Paypal then comment below or contact us.If you found this article helpful then you should share it with your friends.

Monday, 9 June 2014

Top 5 Sites To Send Free SMS Online Without Registration

Today I am sharing 5 Best sites To Send Free Online Without Registration.Many peoples daily send hundreds of SMS to their Friends and other peoples.So these sites will help you to save your money and if your operator SMS service is overloaded then you can also send your SMS via these sites.Checkout Top 5 Sites below to send free sms in India without registration.

Top 5 Sites To Send Free SMS Online Without Registration


Top 5 Sites To Send Free SMS Without Registration :

1. SMSTI :
SMSTI is one of best site to send free sms in India without any registration.Using this site,You can send SMS upto 160 Words and the SMS you send will be Ad Free.This site have very fast SMS delivery System that send the SMS at very fast speed.

2. Bollywoodmotion :
BollywoodMotion is also a good to send free sms in India without registration or creating a account.The main feature that I like in this sending site is that it allow users to send upto 500 Words Sms.Using this site,You can send sms to Tata DoCoMo,Airtel,BPl,Uninor ,Vodafone, Idea and other operators of India.

3. SMSMaza :
SMSMaza is not much popular in peoples to send sms in India without registration but it have very features that makes it 3rd best site to send free sms in India without registration.Using this site,You can send sms upto 120 words.If you want to send longer then you should choose any other site.

4. e-FreeSMS :
If your friends are live in any other countries and you want to send sms to them without registration then this is best site because it allows their users to send to sms to any country for free and without registration.This site send sms to any country at fast speed because of its fast delivery service.

5. SMSIX :
This is also a very good site to sms to any country of the World.To send sms to any number,You just need to select the country and enter recipient's number.So checkout all these sites and send unlimited sms to your friends and family.


These are the Top 5 sites to send free sms in India and other countries without registration.If you like this article then you should share it with friends so that your friends can also send free sms to you and their friends.

Saturday, 10 May 2014

How To Find Location/IP Address Of Email Sender In Gmail

Trace IP Address and Geo-Location Of Email Sender
There are many Email Service providers are available in Internet to send free Emails to everyone.The most used Email Service Providers are Gmail and Yahoo Mail.But there's one problem in Email Service is Fake and Spam Emails.Many peoples use these Email Service Providers to send spam mails to other Email users for their fun.So today I am sharing an article to How To Trace Location and IP Address Of Email Sender.If you're are annoyed by those Email senders then you can find location and IP Address of Email Senders by reading this article.Personally,I recieved many Spam Emails so after Googling it for few day,I found a way to find Location and IP address of Email Sender to help you to stop spam mails.If you want to trace location and IP address of Email Sender then follow below steps.

How To Trace IP Address Of Email Sender In Gmail :

Step 1 : Log In to Gmail.com with your Email ID and Password.
Step 2 : Now Open any Email for which you want to find IP Address.
Step 3 : Click on More button and then click on Show Original button.

Trace Location and IP Address of Email Sender In Gmail

Step 4 : Now a New tab will open with Email Header Code and you need to copy that code.
Step 5 : Now visit Email Tracer tool by [Clicking Here].
Step 6 : Paste the Email Header Code in Email Tracer Tool and click on Get Source button.

After few seconds,You will see Geo-Location,IP Address and other information of Email sender.


Now you can trace Geo-Location and IP Address of any Email Sender easily and for Free.So if you face any problem in tracing Location and IP Address of any Email Sender then Comment below or Contact us.If you like this article then you should it with your friends.

Tuesday, 6 May 2014

How To Verify Email Address (Check if an Email is Valid or Not)

How To Check If Email Is Valid or Not
There are many Email accounts are created and deleted daily on Internet but it is very difficult to check if Email address is working or not.So today I am sharing an article to How to verify Email Address and check if Email Address is working or Not.We can verify the Email Address by using the service offered by VerifyEmailAddress.This service is free of cost and you can verify others email address without paying anything.If not surely know about address then you should verify the email address before sending the Email because one email can cost you anything.There are many ways to verify the email address But I am sharing simplest method to check if email address is exists or not.You can verify email address by completing below steps.

How Can I Check if Email Address is Valid or Not :

As I already told you that you check if email address is valid or not by using a service offered by VerifyEmailAddress.You can verify Email address of any Email Clients like Gmail,Yahoo for free without any cost.

How To Verify Email Address :

1. First of all, Visit www.verifyemailaddress.org.
2. Enter Email address which you want to verify.

Verify Email Address

3. Now click on 'Verify Email Now' Button and wait until Email Verifier check if Email Address is working or not.
4. If all the three check marks are correct then the email address you enter is correct and valid.


Now you can easily verify any Email Address whatever it is hosted in Gmail or Yahoo Mail.If you face any problem on verifying Email Address then comment below or Contact us.If you found this article helpful then you should share it with your friends.

Monday, 28 April 2014

Top 5 Best Google Chrome Extensions Of 2014

Google Chrome is most used Web-browser.There are thousands of extensions are available for Google Chrome to make your tasks and browsing easy.As I already told you that their are many extension are available for Google Chrome so it very difficult to choose best and popular extension.So In this article I am sharing list of Top 5 Best Chrome Extensions with you.You can view list of Top 5 Best Chrome Extensions below.

Best Google Chrome Extensions

Top 5 Best Chrome Extensions Of 2014 :

1. Adblock Plus :

Adblock Plus is most popular Google Chrome extension of 2013 and it is used by 15 millions peoples from all over the World.You can block all advertisements from Webpages,Videos and Facebook by using this Chrome extension.After you install the Adblock Plus in your Chrome browser then all annoying advertisements will be blocked and you will not able to see the advertisements again.You can install the Adblock Plus extension in your Google Chrome web browser by visiting Adblock Plus Extension page.


2. Gmail Offline :

Gmail Offline is also a best Google Chrome extension and it is used by over 4 Millions chrome users.It allow you and other users to Send,Reply and Receives the emails offline without connecting to Internet.For more information about Gmail Offline Chrome Extensions visit Gmail Offline Extension page.


3. LastPass - Free Password Manager :

LastPass is the best Password Manager for Google Chrome browser.It is used by almost 2 millions peoples from all over the World.After installing LastPass, You can manage all your passwords and secure your Computer from hackers.You can install LastPass in your Chrome browser by visiting LastPass Extension page.

4. Google Dictionary :

Google Dictionary is best dictionary extension for Google Chrome and it was developed by Google.You just need to double-click on any word and the meaning of word will shown in pop-up bubble.You can add Google Dictionary extension to your Chrome browser by visiting Google Dictionary Extension page.

5. Any.Do :

Any.do allow you to remember your tasks so that you will not able to forget any task.It is very easy to use.You can install Any.do in your Chrome browser by visiting Any.do Extension page.


These are the 5 best Google Chrome extensions of 2014.These extensions or plugins will makes your browsing experience easier and simpler.If you know about any other Chrome extension then comment below.if you like this article then share it with your friends.

Thursday, 24 April 2014

How To Record Skype Video/Audio Calls

Record Skype Video And Audio Calls Free
Skype is most popular voice-over-IP and instant messaging service in the World.It was released in August 2003 and since that it is becoming more and more popular.It is available for all major operating systems like Mac, Windows, Android, iOS etc.Almost every Internet user has a Skype account.But there is one problem in Skype that we could not record video or voice calls on the Skype.So today I am sharing an article to How to record Skype calls on Windows,Mac and iPhone/iPad.So if you want to record your Skype calls then continue reading and read until end of article.

How To Record Skype Video/Audio Calls On Windows :

You can record the Skype Video and Audio on your Computers/Laptops by using software called Pamela For Skype.It is available in both Paid and Free(Trial) versions.But it only record calls less than 15 Minutes in Free version.So if you not have money to buy paid version of Pamela For Skype then you can also use the Free Skype Recorder Software.This software is completely free and there are no limitations in this software for recording skype video-audio calls.

Note : Pamela For Skype not work for Metro Ul Version Skype so you should use Skype Desktop Version to record video and audio calls easily.

How To Record Skype Calls On Mac :

There are hundreds of Mac applications are available in Internet for recording Skype Video-Audio calls.But I recommend you to use Ecamm Call Recorder.It is paid application that mean you need to buy it for recording Skype Video-Audio calls but you can also use its trial version if you have any problems.If you not have money to buy paid application for recording Skype Video-Audio Calls then you can also use free Skype Video-Audio recorder.You can find the Skype Video-Audio Recorder by searching on Google or any other search engine.

How To Record Calls On iPad/iPhone :

Recording the Skype calls on iPad/iPhone is very different from recording calls on Windows or Mac.In iPhone/iPad,First you need to make a Skype call then run any voice recording app on the background and then your voice recording app will start recording Skype Audio calls on your iPad/iPhone.You should use QuickVoice Recorder for recording Skype Voice calls because it is free and full-featured application.


Now you can easily record your Skype Calls on Windows,Mac and iPad/iPhone.I please you that you should not record calls on Skype without informing your partner because recording calls on some countries without informing in prohibited .So if you face any problem in recording Skype calls on any device then comment below.if you like this article then share it with your friends.

Monday, 31 March 2014

How To Download Facebook Videos Easily

facebook video download
Facebook is most popular social networking site in the World for sharing photos and videos.We all know that Facebook is best for sharing personal videos but downloading videos from facebook is not easy because videos are strongly encrypted.You can download the videos from YouTube,Dailymotion and Vimeo easily with the help of download managers and other tools but their is no good software is available to download Facebook videos easily so today I am sharing an article to How to download Videos from Facebook without using facebook video downloaders.You can download Facebook videos with the help of website called www.downvids.net.There are many sites are available in Internet to Facebook videos but www.downvids.net is best.The main feature of this site is that you can also select the quality of video before downloading.Downvids.net app is also avaible for Android that means you can also download your favorite Facebook videos on your Android phones.So if you want to download your facebook videos without using any softwares then follow the steps given below.

How To Download Videos From Facebook :

1. First of all open the Facebook video which you want to download on your Computer or Laptop without using any Facebook Video Downloaders.
2. Copy the URL of the Facebook Video which you want to download.

download video from facebook

3. Now visit www.downvids.net and paste the copied Url of facebook video in it.
4. Now select the quality of video which you want to download and click on Download ! button.

download facebook videos

4. Now Downvids will start processing your Facebook Video and after Facebook video is processed then you can download by right-clicking on Download This Video and then clicking Save As.


After completing all steps your video will start download and you will able to watch it offline.

Alternate Method For Downloading Facebook Videos :

1. Visit www.savevideo.me and paste the url of your Facebook video.
2. Now click on Download button and wait until www.savevide.me process your video.


3. Now select the quality of facebook video and click on Download Video File.
4. Now your facebook video will start downloading.


Now you can download your favorite facebook videos with any download manager.If you want to remove annoying ads from www.downvids.net then you should install Adblock Plus extension in your web browser.You can also download YouTube videos by using above method but you should need to paste YouTube video url instead of pasting Facebook video Url.So if you face any problem then comment below or contact us.If you like this article then share it with your friends on Facebook.

Sunday, 30 March 2014

How To Use Gmail Offline In Chrome

How To Access Gmail offline On Pc or Laptop
Gmail is most popular web-based e-mail service in the World.It was developed by Google.Gmail is very useful in Sending,Replying and Composing new messages.Now you can also access your Gmail account offline with the help Gmail Offline Chrome app.This Chrome app was also developed by Google to allow Gmail users to read and compose new messages without Internet.When you first time use Gmail offline then it automatically sync all your data from your Google mail account.It is one of most popular app for Google Chrome and used by millions of peoples.Many times you want to read and compose messages in Gmail without Internet connection because your Internet Data Plan was ended or their is any other problem in your Computer internet.So if you want to access Gmail Offline on your computers and laptops then follow the steps that are given below.

Advantages Of Using Gmail Offline :

  • It Saves Your Internet Cost
  • Search Your Mails
  • Reply Mails
  • Compose New Emails
  • Read Your Mails

How To Use Gmail Offline On Pc And Laptop :

1. First of all install Gmail Offline App in your Google Chrome Web browser.You can install the Gmail Offline Extension in your Google Chrome browser by clicking here.

Gmail Offline Chrome

2. Now go to Apps of your Google Chrome Web Browser.You can go to Apps by typing chrome://apps in the address bar.

Read Gmail Mails Offline

3. Now click on Gmail Offline icon.
4. Now select Allow offline mail and click on Continue button.


Now Gmail Offline will start syncing all your mails and you will able to access Gmail Offline after synchronization is completed.After your computer or laptop is again completed with internet then Gmail Offline app will start searching and syncing for new mails.But it only store 10,000 Approx. offline mails and messages.If you face any other problem rather than above problem then comment below or contact us.If you like this article then share it with your friends and other Gmail users.

Thursday, 27 March 2014

How To Save Browsing Session In Chrome,Firefox and IE

Google Chrome,Mozilla Firefox and Internet Explorer are best browsers for the computers and laptops.But these browsers don't have built-in function to save browsing sessions.So today I am sharing an article to How to save browsing sessions in Chrome,Firefox and Internet Explorer to continue your browsing after rebooting the computer or laptop.It is very useful for peoples that use Internet daily.You can backup your browsing tabs by using a browser extension called Session Manager.It is available for all major browsers like Chrome and Firefox.So if you want to save your current browsing tabs then continue reading.


How To Save Browsing Session In Google Chrome :

1. First of all,Download and install Session Manager extension on your Google Chrome browser by Clicking Here.
2. If you want to save your browsing session then click on Session manager.
3. Type the name of your browsing session and click on Save button.

Now your browsing session was saved in Google Chrome and you will able to continue your browsing after long time by just clicking on Session Manager and then clicking on Open button.

How To Save Browsing Session In Mozilla Firefox :

Session Manager Plug-in is also available for Mozilla Firefox that means that you can save your browsing session in Firefox for future use.So if you want to save your browsing sessions in Mozilla Firefox then follow the steps given below.

1. Session Manager extension for you Mozilla Firefox browser by Clicking Here.
2. Install it in your Firefox browser.
3. Now open the tabs which you want to save for future use and click Save Session button.

Now your current browsing session was saved in Firefox and you can restore this session by right-clicking on Session Manager then clicking on your saved browsing session.

How To Save Browsing Session in Internet Explorer :

In Internet Explorer,You can save your browsing session by using a software called IE Session Saver.You can download the IE Session Saver by Clicking Here.


Now you easily save and restore your browsing session.So if you face any problem about this article then comment below or report us by visiting our contact us page.If you found this article helpful then share it with your friends.

Saturday, 22 March 2014

5 Best Ways To Open Blocked Sites In Schools,Colleges And Offices

5 Best Ways To Open Blocked Sites In Schools,Colleges And Offices
Today I am sharing 5 best ways to open blocked sites in schools,colleges and offices.Many colleges and schools blocked the social networking sites on the computers so that students can concentrate on their studies but many students want to use social networking and other sites on their laptops and SmartPhones so those students can access the blocked websites in Colleges,Schools and Offices by reading out 5 best ways to open blocked sites.So if you want to open the block sites on your School,College and Office Computers or Laptops then read the five best ways that are given below.

5 Best Ways To Open Blocked Websites :

1. Open Blocked Websites Using Proxy Sites :

The one of best method that everyone use in Schools,Colleges and Offices to unblock sites is Proxy sites.You can surf or browse the internet anonymously by using the proxy sites.These sites hide all your details like your IP Address while you're surfing the Internet on your Computers or any other devices.The list of 5 best proxy sites to access blocked sites is given below.

2. Access Blocked Sites Using Tor Browser :

This is also one of mostly used method to access blocked websites on your computers and other devices.I also use this method when I want to surf the internet anonymously because Browser also opens those sites that required cookies like Facebook and MySpace.The Tor Browser is released for all major operating systems to access blocked sites.You can download the Tor Browser for all your Computers,Laptops,Mac and SmartPhones to access the blocked websites anonymously.

3. Open Blocked Websites Using Hola Browser Extension :

Hola Unblocker is browser extension that allow you to browse the blocked websites anonymously.It is available for all major browsers like Chrome and Firefox.But if Hola Unblocker is not available for your browser then you should install Halo Unblocker software on your Computer and SmartPhones.It is also available for all major Operating Systems like Microsoft Windows,Android and Mac.You can download the Hola Browser extension and software by Clicking Here.

4. Access Blocked Sites Using IP Address :

Websites are blocked in Schools,Colleges and Offices by the names of the websites that means that you cannot open the websites that are blocked on your browsers but websites are not blocked with the IP address that means that you can open any blocked website on your computers and laptops by entering the IP Address of Website.You can find the IP Address of any website by following the steps given below.

How to Find IP Address Of Any Site :

1. Open Run on your Computer or Laptop by pressing Windows Key + R.
2. Now enter CMD in Run and press Enter button.
3. Now enter Ping Website.com in Command Prompt and replace the Website.com with any website which you want to open in your browsers.
4. Press Enter button.
5. Now enter the IP Address of website in Web Browser and browse any website using IP Address.

5. Access Blocked Websites Using Google Cache :

Popular Search Engines like Google and Yahoo cache the pages of all websites.You can Access the blocked websites on your browser by searching for website which you want to access and then clicking on Cache link.This is simplest and securest method to unblock any website without using software or 3rd party website.
Now you can easily access all your favourite websites in Schools,Colleges and Offices.If you failed to unblock any website then comment below or contact us.If you found any other method to unblock blocked sites then notify us.If you like this article then share it with your friends.